Scandinavian Meatballs

Scandinavian Meatballs

I’m calling these “Scandinavian” because I consulted my Norwegian grandmother’s recipe for the meatballs themselves and stole elements of a Diana Henry recipe for Swedish meatballs (in her book “Roast Figs Sugar Snow”) to make the sauce.

Surprisingly, even though my mother gave me her mother’s meatball recipe years ago, I had never used it before. I make meatballs a lot, but usually Italian-style ones in a tomato sauce to serve with spaghetti. It’s good to have a change and these, dare I say it, are just as good or possibly better. If Italian flavours are what you’re after it’s simpler just to make a ragù.

The addition of baking powder to my grandmother’s meatballs is a revelation: it makes them wonderfully light and airy. You can serve these with lingonberry sauce or jam. My son bought me some at SkandiKitchen in London. Ikea sells it too, but if you haven’t got any, cranberry sauce would also go well. I served them with braised, spiced red cabbage and plain boiled potatoes, which struck me as being very Norwegian. I’d like to think my grandmother would approve and that she’d be pleased I served them on her Porsgrund china plates. IMG_3152

Scandinavian Meatballs

Ingredients

Meatballs:

  • 500g pork mince
  • 500g beef mince
  • 1 heaped tsp salt
  • 1 heaped tsp baking powder
  • 1 heaped tsp ground white pepper
  • 1 heaped tsp ground ginger
  • 100g breadcrumbs, soaked for about 30 minutes in 150ml milk until all the milk has been absorbed
  • About 1 tbsp sunflower or groundnut oil

Sauce:

  • 400ml chicken or beef stock
  • 20g butter
  • 1 tbsp sunflower or groundnut oil
  • 1 tbsp plain flour
  • 200g sour cream
  • 3 tbsps chopped fresh dill

Method

  • Mix all the ingredients for the meatballs thoroughly in a large bowl. You could do this in a food processor
  • Using wet hands form the mixture into balls. I’ll leave the size to you
  • Fry in a little oil until brown. I “fried” them, drizzled with oil, on the large Aga baking tray for five minutes on the floor of the roasting oven before turning them over and frying for a further five minutes or until they were nicely browned. Doing it in the oven like this stops the Aga losing heat and means you don’t get fat splashing over the Aga top
  • Heat the butter with 1 tbsp oil in a large saucepan or sauté pan on the simmering plate. Add the flour and cook, stirring until the flour is golden
  • Take the pan off the heat and gradually add the stock, stirring well after each addition
  • Put the pan back on the simmering plate and bring the liquid up to the boil, stirring constantly
  • Add the sour cream and then the meatballs
  • Cover and place in the simmering oven for at least 30 minutes (but as you know, they will be fine if left there for much longer than that) until the meatballs are cooked through. (If you are short of time you could cook them for about 15 minutes in the baking oven.)
  • Taste for seasoning, add the chopped dill and serve


Fårikål

Fårikål

I wrote about this Norwegian dish on my Tumblr a few years ago. Making it last night reminded me how incredibly simple but delicious it is, so I thought I’d republish it here.

The translation of fårikål is “lamb (or mutton) in cabbage” which, to be honest, probably isn’t making you want to try it. However, I urge you to as it’s a very plain dish on the face of it but easy to make and very delicious, wholesome and warming: the ultimate comfort food. It’s traditional to eat it in the autumn in Norway, but there’s no reason at all not to make it in February or any other (winter) month.

I was interested and delighted to read that the recipe Magnus Nilsson gives for this dish in his wonderful The Nordic Cook Book is more or less the same as the one that’s been handed down to me by Norwegian grandmother via my mother.

Here’s what you do.

Take some chunky pieces of lamb on the bone. My mother used to use chump chops, but I’m not sure if this term is used these days.

Take a large white cabbage (or a green one, but my mother always used white so that is what I do too), or a small one if you’re only cooking for a couple of people. Cut it into fairly large wedges.

In a casserole or large saucepan layer the cabbage and the lamb, sprinkle in some salt and fill it half way up with water.

You now need to add black peppercorns and it’s very handy if you have one of these spice infusers (see photo). When I was growing up my mother would bring these back from Norway for all her friends. I’ve never seen them in the shops here but my husband spotted this “Spice Infuser GUSTO” from Gefu online which I’m sure will do the same job. IMG_2009You fill it with whole black peppercorns and place it in among your lamb and cabbage. Then you simply remove it at the end of cooking and diners don’t have to bite into peppercorns, which can a)  give them a fright or b) break their teeth. It’s also not very pleasant. Of course if you haven’t got one you can tie the peppercorns (about a tablespoonful) in a muslin bag or indeed live dangerously and leave them loose in your stew.


Bring the whole thing to the boil on the boiling plate and then place it, covered, in the simmering oven for a minimum of two hours but preferably longer until the lamb and cabbage are tender.

Some like to thicken their fårikål by dusting the raw lamb pieces with flour, but I have never done this and don’t think it’s necessary.

Serve with plain boiled potatoes and plenty (and I mean a lot) of chopped parsley.


Christmas Recipes: Norwegian Spiced Pork Belly

Christmas Recipes: Norwegian Spiced Pork Belly

For me Christmas is not the time for trying out new recipes so our Christmas Eve and Christmas Day meals don’t change much from year to year. When I was growing up (in England) with my Norwegian mother and English father we celebrated Christmas the Norwegian way on Christmas Eve and the English way on Christmas Day. This meant my brother and I could open our presents on Christmas Eve and our friends were rather jealous. The evening would begin with dinner and then we’d sit round the Christmas tree for the present opening. I’ve never opened presents on Christmas Day so I don’t know what it’s like but I can tell you there is something magical about doing it by candlelight when it’s dark outside.

When I married my husband I was fully expecting to leave the Norwegian Christmas Eve behind but he loved this way of doing it with all the cosiness and candles and insisted we kept the tradition going. I’m so glad we did because our children have always loved it, partly because it makes their Christmas a little bit different from their friends’. 

Christmas Eve: Herrings

Our Christmas Eve meal always starts with Norwegian pickled herrings. We buy them from the Christmas Bazaar held every November in the The Norwegian Seamen’s Church in Rotherhithe, London. When she was younger, my mother used to spend a couple of days with friends in London helping to prepare these for sale at the bazaar. She doesn’t do that anymore so my sons have accepted the mission of going along on the Saturday of the bazaar and purchasing a few jars of this most delicious food. I haven’t managed to join them yet but intend to go along one year, if only for the waffles, cake and coffee on offer inside the church! We eat the herrings on rye bread accompanied by ice cold Linie Aquavit straight from the freezer and cold lager. So delicious.

Christmas Eve: Spiced Pork Belly

There is more than one traditional Christmas Eve meal in Norway. On the West coast they have cod cooked in a special way.  It is bought very fresh, cut into steaks, put in salted water overnight to tighten the flesh and then poached. It is served with melted butter and lots of chopped parsley and plain boiled carrots and potatoes. Perhaps surprisingly, Norwegians always drink red wine and not white with this dish. My mother’s family always had reindeer for their Christmas Eve meal but spiced pork belly, popular as a Christmas dish on the south coast of Norway where my grandfather was from, would also form part of their festive fare. We have made pork belly our traditional Hardy family Christmas Eve dish. I make it according to my grandmother’s recipe, passed to me by my mother, who has given me permission to share it with you here.

You will need:

  • Pork belly (you decide how much, depending on how many people you are feeding, but remember, it tastes just as good cold so any leftovers will not go to waste) with the skin removed (I get my butcher to do this) but the fat – very important this – left on
  • Ground ginger, salt, mustard powder and white pepper. I’m not giving you quantities except to say: be generous

Method

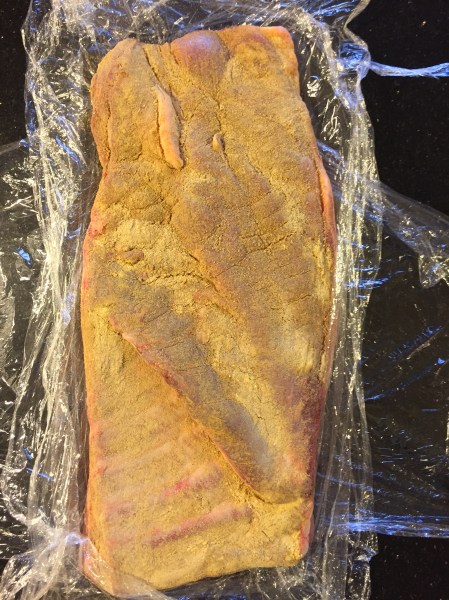
  • The day before you want to serve the belly score the layer of fat with a sharp knife and rub lots of white pepper, ground ginger, mustard powder and salt into it on both sides and wrap it in clingfilm IMG_4150
  • Place it in the fridge fat side down for at least 24 hours
  • On Christmas Eve in the morning take the belly out of the fridge and let it come up to room temperature
  • Sprinkle on some more salt
  • Choose a roasting tin (I always use the large Aga roasting tin because I tend to cook a whole belly), remove the clingfilm and place the meat in the tin, fat side down
  • Add about a cupful of water and cover with foil
  • Hang the tin on the second or third set of runners of the roasting oven, taking care that the foil doesn’t tear as you slide it in
  • After twenty minutes take it out, remove the foil, turn the pork over and add a little more water if it looks dry
  • Slide the tin onto the floor of the simmering oven and leave it there for the rest of the day, checking the water level every now and then. It will be cooked and delicious after five hours but even better and falling off the bone after eight or nine

I serve it with spiced red cabbage and roast potatoes, having made a divinely spicy and gingery gravy by adding some wine and sour cream to the meat juices.

For pudding we usually have this Norwegian apple cake which my mother makes for us according to my grandmother’s recipe.  


Aubergine and Pea Curry

singin-in-the-rain-7438_1

So that’s it for another year and we can get back to normal, whatever “normal” is. The tree has been taken down and is currently awaiting collection in our front garden; all the decorations have been stored away in the spare room cupboard; and Sons 1 and 2 have returned to work, in Cambridge and London respectively. It was so lovely to have them at home, sometimes with and sometimes without the girlfriend of one and  the fiancée of the other, and although I should be used to it, I always feel a little sad when they’ve gone; not too sad, mind, because, as my mother says, if your children are happy to leave home, then you have probably done a good job as a parent. Son 3 stayed on for an extra couple of days which softened the blow, as much for his younger brother as for their parents. We all love films but Son 3 is the proper film buff of the family and at his suggestion we sat down on Monday evening to watch Singin’ in the Rain. I hadn’t seen it for years and had forgotten just how marvellous it is and what a wonderful actress the late Debbie Reynolds was: RIP. He returned to London with his dad yesterday, leaving youngest son and me, and Granny in her flat downstairs, in a very quiet house until the weekend.

Before he left I borrowed one of his Christmas presents to make supper: the book Fresh India by Meera Sodha, which is on the bestseller lists. Having eaten so much meat over Christmas we were all craving meat-free dishes and the aubergine and pea curry fitted the bill. The last thing I need is another cookbook but if this recipe is anything to go by, I might be adding this book to my birthday wish list.

Aubergine and Pea Curry

  • 5 tbps rapeseed oil
  • 1 teaspoon cumin seeds
  • 2 large onions finely chopped
  • 6 cloves of garlic, crushed
  • 4 large ripe tomatoes, chopped
  • 1 1/2 tbsps tomato purée
  • 1 1/2 level tsps salt
  • 1 1/4 tsps chilli powder (unless like mine, yours is very hot, in which case use less)
  • 1/2 teaspoon ground turmeric
  • 1 teaspoon sugar
  • 4 medium aubergines 1.2kg, chopped into 3cm cubes
  • 100g (I used 200g) peas (fresh or defrosted)
  • Put the oil in a wide-bottomed lidded pan on the simmering plate (conventional hob: medium heat). Once hot, add the cumin seeds and stir for 30 seconds. Add the onions and stir to coat in the oil. Cook (in the simmering oven) for 15-30 minutes until translucent but not brown.  Add the garlic and stir-fry for a couple of minutes
  • Add the tomatoes and purée and cover with a lid. Leave to cook for 5 minutes (or longer in the simmering oven), then add the salt, chilli powder, turmeric and sugar and cook for a further couple of minutes
  • Now add the aubergines, coating the pieces with the masala, pop the lid back on the pan and cook for around 10 minutes (or longer in the simmering oven). You want the aubergines to be tender and soft with little or no water running from them. If they’re watery or not yet tender, they may need another few minutes’ cooking
  • When they’re cooked, add the peas and cook for a couple of minutes
  • Serve with hot chapattis or plain boiled Basmati rice

NB:

  • I used one of those large round aubergines from Natoora. It weighed 620g and I was worried it would not be enough but it was plenty. Am therefore a little baffled by the aubergine quantity recommended in the book. Would it not have led to a very dry curry?
  • Also: I only used 5 cloves of garlic and 1 large onion.


Apologies that I don’t have a photo of this dish (but then nor does the book!). Instead here are a few photos of our Christmas.


Norwegian Bløtkake

fullsizerender-2

This traditional Norwegian celebration cake (translation: soft cake) is part of my childhood in a way that no other food is. My grandmother, aunts, and mother all baked it regularly when I was growing up and then my mother passed the recipe on to me. Nowadays when we go on holiday to Norway, it’s my cousins who make the bløtkake and no doubt they have passed the recipe down to their children as I will to mine.

My mother is a great cook and loved introducing her British friends to Norwegian specialities, but when she was first married to my (English) father she also learnt to do an excellent Sunday roast and many other British recipes. She would make a bløtkake for our birthdays and if friends were coming round. For a few years she ran a small catering firm specialising in parties and weddings, and this cake was probably what her customers requested the most. I can remember helping her with deliveries sometimes which involved me sitting in the passenger seat of her car with the cake in a container on my lap, hoping we didn’t have to brake suddenly.

The cake is not complicated or difficult to make. It uses a fatless sponge so you needn’t feel guilty about the amount of cream required to make this cake delicious and special. I made it recently for my youngest son’s 18th birthday.

Ingredients

You will need an 8″ or 9″ springform cake tin, very lightly greased and base-lined.

  • 5 large eggs
  • 125g caster sugar
  • 125g self-raising flour
  • 300ml (or more) double or whipping cream
  • Fruit: strawberries, raspberries, blueberries or banana or combinations of these. I’m sure you will come up with other wonderful fruit ideas, depending on the season. The one above was a mixture of raspberries and blueberries. I also can’t give you quantities but I’m sure you’ll manage
  • Juice or milk for moistening the sponge

Method

  • Pre-heat a conventional oven to 150ºC
  • Whisk the eggs and sugar (ideally in a mixer or using an electric hand whisk) for 8-10 minutes (depending on the power of your whisk) until thick and very pale in colour. When you lift the whisk the mixture will leave a trail like a ribbon
  • Then fold in the flour; do this gently to keep in as much air as possible
  • Pour the mixture into your prepared tin and bake in the baking oven (see above for conventional oven temp) for about 25-30 minutes. Check it at 20 minutes and maybe turn it round so the other “side” is nearer to the back. If using a conventional oven, don’t even think about opening the door until it’s been in for 20 minutes. It is done if it springs back when pressed down gently with your finger
  • Cool on a rack for at least 10 minutes before turning it out of the tin. Leave it to cool upside down
  • When the cake is cold slice through the middle horizontally so you have two pieces. Even better, slice it into three layers.  In fact, I wish I’d done this for my son’s cake and will definitely do it next time. It makes a more impressive, moist and luscious cake. You may need more cream but given it’s a cake based on having lashings of cream, who’s going to quibble about that?
  • You need to moisten the sponge layers before filling the cake. You can use juice from the fruit (I had frozen raspberries which released a lot of juice after defrosting); or a little diluted elderflower cordial; or milk. We’re only talking about a couple of dessert spoonfuls
  • Whip the cream
  • Sandwich the cake together with the cream and fruit. Be generous with both
  • Finally, spread the rest of the whipped cream thickly over the whole cake and decorate with a little more fruit
  • It is customary to cut a circle in the middle of the cake and slice it from there. If it’s a birthday cake, the round piece can be saved for the birthday boy or girl

One more thing: if you don’t eat the whole cake at first sitting, and it is definitely best when fresh, make sure you store it in the fridge.

Update

My mother has read this post and passed on a tip which finishes the cake off nicely: keep back a little cream for piping round the bottom. As you can see from the photos, mine has a bit of a gap and would have been improved hugely if I had done this. What can I say, except I clearly haven’t inherited my mother’s knack for presentation.

Norwegian Apple Cake

Norwegian Apple Cake


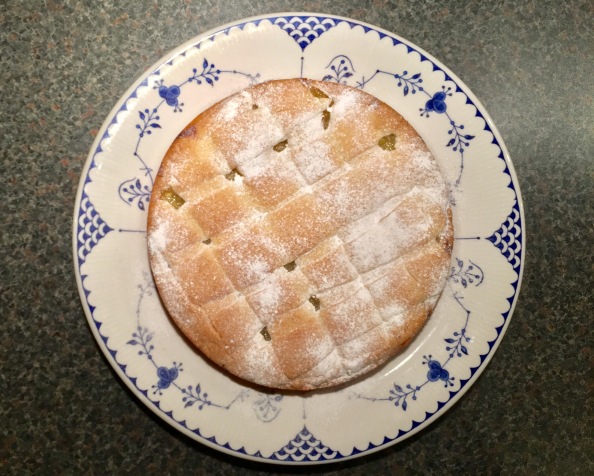
In this post a year ago I mentioned my Norwegian grandmother’s apple cake. It has become a Hardy family tradition to have it on Christmas Eve, but that doesn’t stop us having it at other times of the year. I have vivid memories of evening coffee time at my grandparents’ house in Oslo when cake would often be served.

I made the Norwegian apple cake this weekend for second son’s birthday. It’s not a typical birthday cake but I don’t think that matters. We managed to get his brothers to come along and gathered in London for tea and cake which we consumed while watching the England v Wales Six Nations rugby match. img_6492

I don’t think my grandmother, who is no longer with us, would mind if I gave you the recipe.  It’s extremely easy to make. You can keep it just as it is, or add cinnamon to the apples or sprinkle some flaked almonds over it, or both.

Norwegian Apple Cake

You will need a 20cm/8″ springform cake tin, greased and base-lined with greaseproof paper or bake-o-glide.

Conventional oven: pre-heat to 160º-170ºC

Ingredients

  • 4 Bramley apples
  • 125g plus 1 tbsp caster sugar
  • 125g butter, softened
  • 240g self-raising flour
  • 1 large egg

Method

  • Peel, core and slice the apples and place the slices in a bowl with the juice of a lemon to stop them going brown. Add the tablespoon of sugar
  • Place the apples in a saucepan with a little water, let’s say 3mm deep. Cook them for a minutes on the Aga simmering plate or your hob, giving them the occasional stir with a wooden spoon. When they’re all soft, remove from the heat and leave to cool
  • Make your cake batter by placing the sugar, butter, flour and egg in a bowl and beating the mixture. I use my electric mixer
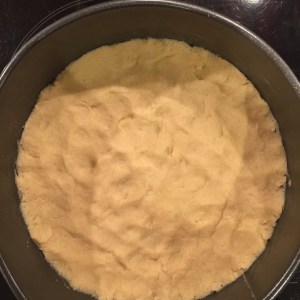
  • Press two thirds of this mixture into the base of your prepared tinimg_4305
  • Then spoon the stewed apples over this but not right up to the edge. If you feel you have too much apple mixture (after all, Bramleys vary in size) save some (freeze it if necessary) to have with roast pork at a later date
  • On a floured surface very gently roll out the remaining third of the batter and then cut it into strips about 1.5cms wide
  • Arrange these strips in a lattice pattern over your cake. You don’t have to make a complicated over and under pattern. The dough is very soft and the strips might break as you pick them up. img_4306Don’t worry: you can just patch them together as you place them. As you can see from the photos, mine does not look remotely professional
  • Bake your cake until golden brown. You can’t test it because of the apples.  I find it usually takes between 35 and 45 minutes.  I start checking it at about 25.
  • You can serve it warm (but not piping hot) or at room temperature, dusted with icing sugar and cinnamon. I’m not a cream person but this cake really is best served with a dollop of lightly whipped cream.img_4319

Waffles


When I was young we used to go to Norway for the summer holidays every other year.  My brother and I would go with our mother for about six weeks and my father would join us for two or three weeks.  We’d stay mainly with my grandparents in Oslo but would also visit my aunt and cousins in Kristiansand on the south coast and my uncle and cousins in Stavanger on the west coast.

Norway was, and still is, an idyllic place to be on holiday if you love being outdoors and don’t like hot, sweaty crowded beaches or crowds full stop.  It is relatively unspoilt with some of the world’s most stunning landscapes.  Not that I’m biased or anything.  Many Norwegians have a holiday home, or “summer house”, either in the mountains, by the sea or on one of the thousands of tiny islands dotted along the coastline, where they spend a lot of time during June and July when the days are long and it barely gets dark at night.  We would spend our days fishing, messing about in boats, or clambering over rocks looking for shrimps and crab.  Even in Oslo, the capital city, peaceful lakes and forests are but a short tram ride away.  As a child growing up in Oslo my mother used to ski to school.  During the long, cold winters it was the easiest way to get around.

So often one’s memories of childhood holidays are evoked by the food one ate and this is very true of our Norwegian stays.  There were the shrimps bought straight from the boat as it arrived back at the harbour in the early morning; the freshest ever mackerel, gutted, filleted and painstakinglingly de-boned by my grandmother or aunt and fried in butter until the skin was golden and crisp; juice made from homegrown blackcurrants, raspberries and redcurrants; the most divine homemade strawberry jam, more runny and less sweet than any you’d buy in a shop and all the better for it; tiny home-baked bread rolls which accompanied every picnic we went on, and there were a lot of picnics.  And then there were the waffles which would be served every time we were invited to friends or relatives for tea or coffee.  At least, that’s how I remember it!

I suspect there isn’t a Norwegian household without a waffle iron.  I remember my mother buying her electric one in Norway because you couldn’t get them here at the time, but the other day in my local shop, Kitchens, I noticed several on display so times have obviously changed.  You will see from my photos that my waffle iron, which my mother gave me years ago, is no longer pristine, but it works well.

As a Bank Holiday treat I made waffles for breakfast this week and I thought you might like the recipe.  Cardamom is the key ingredient I think but it’s a small amount and the flavour is subtle; strangely enough, I don’t remember noticing cardamom in the waffles I ate as a child.

Ingredients

  • 3 eggs
  • 110g caster sugar
  • 250ml whipping or double cream
  • 500ml milk
  • 1/2 tsp cardamom, ground
  • 1 tsp baking powder
  • 400g plain flour

Method

  • Beat the eggs and sugar together.
  • Sieve the flour with the baking powder and cardamom
  • Using an electric hand whisk or mixer, add the flour mixture and milk/cream to the egg alternately to make a thick batter
  • Ladle into the waffle iron and cook
  • Serve with jam and/or butter or clotted cream, but they are also delicious plain


Orange and Poppy Seed Cake

IMG_1522

For some reason I haven’t done any baking for a while. It might be because there have only been three of us to feed most of the time but that’s not usually sufficient reason. If I don’t want a cake to go stale before we’ve finished it, I bake a small one or perhaps some cookies, scones, muffins or individual cakes like these rock cakes, so I can put some in the freezer.

My son and his fiancée have just moved into their first flat together. They don’t own it of course – what young couple can afford a mortgage nowadays? – but they’re very happy and excited and it’s made me very happy on their behalf. It’s also reminded me of what it was like when my husband and I started out. They have very little so I’ve gone through some of my cupboards, digging out glasses, crockery and other items we no longer use and my husband found them a very nice pine table in our garage. They only have one bedroom so they sensibly bought a sofa bed for the living room. This has still not been delivered (a frustrating tale which my Twitter followers might be aware of) but it will arrive next week and their little home will be more or less complete.

Anyway, I digress. Perhaps it was all the vicarious home-making activity that led me to bake a cake today. I opted for a recipe for an orange and poppy seed cake recipe from the Nordic Bakery Cookbook. I don’t think I’d ever made a cake with poppy seeds before but at a café in Bristol recently, youngest son raved about the lemon and poppy seed cake so I thought he might be pleased to find something similar waiting for him on his return from school this afternoon. I was right. We both love the cake and have decided that simple Nordic cakes like this are our favourites: no icing or decoration of any kind; just wholesome and declicious.

Here’s the recipe, which I tweaked a little. I don’t like an overpowering vanilla flavour (a legacy from being forced to eat lumpy custard at school in the cruel 1960s) so I used 2 teaspoons here instead of 3. I also used the all-in-one method to mix the batter. I find it works for most cakes, and is much quicker, obviously.

Orange and Poppy Seed Cake

You will need a 20cm/8inch round cake tin, greased

Ingredients

  • 300g unsalted butter, at room temperature
  • 250g caster sugar
  • 2 teaspoons vanilla extract
  • 5 eggs
  • 3 tsps baking powder
  • 300g plain flour
  • Grated zest of 1 1/2 oranges
  • Freshly squeezed juice of 1/2 orange
  • 1 tbsp poppy seeds

Method

  • (Heat conventional oven to 180ºc)
  • Beat together the butter, sugar, eggs, flour, baking powder and vanilla in a mixer (I used my KitchenAid) or using an electric hand whisk
  • When the mixture is light and fluffy, fold in the orange zest, juice and poppy seeds until well mixed
  • Spoon the mixture into the prepared tin and level the top with the back of the spoon
  • The cake is done when a skewer inserted in the centre comes out clean
  • You may want to put a piece of greaseproof paper over the cake at some point. I did this at 40 minutes because the top of the cake was looking rather dark
  • I baked this in the Aga baking oven for 65 minutes and it was perfect. The original recipe recommends a bake of 50-60 minutes in a conventional oven

Wheat Intolerance and Spelt Flour

Now I’m as sceptical as the next person about the so-called food intolerances and allergies of the modern world, but there’s no doubt about it, many people report feeling unwell or at best uncomfortable if they eat foods containing wheat, and prefer to steer clear of them. A friend staying recently is one such person. She isn’t coeliac so gluten’s fine, but she has discovered over the years that she’s less likely to have stomach aches and feel generally unwell if she doesn’t eat bread, pasta and cakes. Unless, that is, they are made using spelt flour. Spelt is an ancient grain with a unique gluten structure which makes it easier to digest; at least, that’s what it says on my packet. I made the orange and poppy seed cake when she came, but this time substituted spelt flour for plain flour. And, guess what, it turned out the same! Okay, so maybe it was just a tiny bit denser, but it’s possible that, being so determined to find something different about it, I completely imagined this.

Lemon and Poppy Seed Cake

When I substituted lemon for orange in the cake I was very pleased with the result. It was a good way to use up some of the lemons left over from making my son’s birthday cake. I added the juice of two lemons and the zest of one, which produced a subtle lemon flavour. If you wanted a stronger flavour, you could add the zest of a further lemon.


Weekend Cooking

It’s probably very dull and predictable that I almost always go food shopping on a Friday to get what we need for the weekend.  I know I’m not alone in this because I invariably bump into friends doing the same thing.  In fact, Waitrose can be a very sociable place on a Friday morning!

Sometimes meals have been planned and I’ve drawn up a shopping list of ingredients (on my phone – I add to it throughout the week), but some weeks I hope I’ll be inspired by something I see at the butcher’s or in the supermarket.  Last Friday was one of those times.  I bought duck breasts, half a shoulder of lamb and a kilo of minced beef in case I changed my mind about the duck breasts.  When in doubt, make a bolognese or a chilli, is my motto.  The mince is now in the freezer and I slow-roasted the lamb on Sunday.

Duck Breasts 

Because we were going to be watching the Six Nations rugby on Saturday afternoon, I wanted to keep my duck breast recipe simple.  I used two duck breasts for three of us.  If your duck breasts are as large as ours were, you need less than a whole one per person.

Score the fat of your duck breasts and season.  Peel and cut into cubes one medium potato per person and place in a roasting tin in a single layer.  Place the breasts in a cold, non-stick frying pan on the Aga simmering plate (conventional: medium heat) skin side down.  Cook for 8 minutes, pouring the fat as you go along into the roasting tin into which you’ve placed the potatoes.  It would be sensible to line the tin with bake-o-glide (I forgot) because the potatoes might stick a little (as mine did).

After the 8 minutes, place the now golden breasts skin side up on a rack over the potatoes in the roasting tin and cook in the roasting oven (conventional 220ºc) for a further 15 minutes for a pink centre.  If you prefer them well done, increase this time by 5 minutes or so.  Make sure all the delicious fat from the frying pan has gone into the roasting tin.

While this is happening put the frying pan back on the simmering plate and add about a glass of red wine and a little stock (whatever you have to hand; I used Marigold Swiss vegetable bouillon powder).  Let that bubble and thicken a little and then stir in some redcurrant jelly until melted.  I’m not giving you quantities here.  Just think of how many people you are serving; all you need is a little jus to pour over.

Pour the jus into a jug and keep this at the back of the Aga, take the duck breasts out of the oven and continue to cook the potatoes until they are golden brown, tender and crisp.  Keep the breasts warm; they need to rest for 5-10 minutes anyway before being sliced thickly and served.  We ate ours with buttered cabbage.


If you like duck, I can also recommend this Chinese-style duck leg recipe by the excellent food blogger “Eat like a girl”.  It’s where I got the idea for the potatoes in the above dish.  I have made it many times, often for guests and a couple of times for 12 people: I just used two large Aga roasting tins in the roasting oven, one on the second set of rungs and one on the fourth, and swapped them over half way through cooking.  As I’ve probably mentioned before, I love dishes that can be cooked in one dish/pot/tin.  All you need to accompany this one is some pak choi stir-fried in a little oil with some soy sauce.

Tart

This weekend I also made this “Eat like a girl” Blueberry and Cardamom Frangipane Tart.  (More cardamom, I hear you say.  I’m not even going to apologise.)  She only posted the recipe this week so probably hasn’t had much feedback yet.  I can tell you we loved it.  It’s very Scandinavian and would work as a dessert, with morning coffee or afternoon tea.  I thoroughly recommend it.


Candles


When I was growing up people only really used candles on birthday cakes, for a special dinner or if there was a power cut (and there were quite a few in the early seventies during the three-day week). This was not true in my house, however, because my Norwegian mother brought over her country’s tradition of lighting candles at all times of the day or night. She would stock up on them during our holidays in Norway because she swore that Scandinavian candles were better and did not drip.  Imagine her excitement (yes, really) when Swedish, not Norwegian, Ikea opened its first branch over here and she could buy candles almost anytime she felt like it. It meant she could use them with abandon, finances permitting, without having to worry about when she was next going to visit her relatives or when they’d next be crossing the North Sea to visit us and could be persuaded to bring candles with them.

If this is sounding somewhat obsessive I have to admit I’ve inherited the candle dependency. They add ambience, and let’s be honest, make everything look better and hide a multitude of blemishes, whether it be the lines on your face or the chips on your paintwork. What with Scandi Noir TV dramas and a growing interest in Scandinavian cuisine over here, we feel that we know a lot more about those countries. Magazines talk about hygge and give us tips on how to achieve it in our homes. Well, candles are part of that, and you don’t only have to light them when it’s dark. In my family a candle would always be lit at breakfast on someone’s birthday, for example.

I didn’t pay my usual pre-Christmas visit to Ikea to stock up on candles because I felt we had enough to see us through. I was right but I’ve been using them sparingly ever since for fear of running out completely, which would be a disaster. Seriously. Anyway, when I was there the other day I picked up my favourites: Jubla (tall, slim and white; see above), Fenomen (fat and white) and a couple of packs of tealights. I only ever have white candles. Red is lovely at Christmas but doesn’t go that well with the decor in our living and dining rooms so I find it easier to stick to white.

IMG_0721


No recipes for you in this post but there IS food.  It’s hard to drop into Ikea without picking up something to eat. This time I bought spicy ginger biscuits or “pepparkaka”: delicious with a cup of tea or, should you feel the urge, a glass of mulled wine.