Tomato Sauce for Pasta

Tomato Sauce for Pasta

We’re slowly adjusting to being empty nesters. Mind you, university terms are not that long and our youngest will be home for the Christmas holidays in just a few weeks. One thing I’m struggling with though, is reducing the amount of food I buy: I keep overestimating how much we’ll need. I imagine that just when I’ve got it right, it will be time to step up the quantities again for the family returning home for Christmas. And so it is that yesterday I suddenly remembered the San Marzano plum tomatoes I’d bought and not used. I don’t keep tomatoes in the fridge because they lose their flavour. This means they need to be used within a few days of purchase. My tomatoes were fine but starting to feel a bit squidgy; it was time to make a pasta sauce. Pasta with a really good homemade tomato sauce is one of my favourite dishes to eat. We probably had it at least once a week when my children were growing up and I still make it often. I have tried lots of different recipes over the years. The one I probably make the most is this one by Felicity Cloake. But sometimes I just make it up as I go along according to what I have in the cupboard and yesterday I decided to make a sauce using roast tomatoes, based on my friend Kate Percy’s from her book Go Faster Food (you don’t have to be an endurance athlete to enjoy her recipes: I’m certainly not one).  Roasting tomatoes is a great way to use them up when they’re past their best and it also intensifies the flavour of disappointingly insipid ones.

Ingredients

  • 3 x San Marzano tomatoes (or other plum tomatoes)
  • Extra virgin olive oil
  • Sugar
  • Salt and pepper
  • 250ml passata
  • Pinch chilli flakes (optional)
  • 1 clove garlic, peeled and crushed
  • 1 bay leaf
  • Glug of red wine vinegar
  • ½ tsp dried basil (or a couple of stalks of fresh basil if you have it)
  • 250g spaghetti or pasta of your choice

Method

  • (Pre-heat conventional (fan) oven to 140ºC or 170º if you’re in a hurry)
  • Place the tomatoes on a baking tray lined with bake-o-glide
  • Drizzle with olive oil and season with salt and pepper
  • Sprinkle lightly with sugar
  • Place in the simmering oven for 3-4 hours until shrivelled and the aroma is intense
  • Tip the roasted tomatoes and all the residual juices from the tray into a saucepan or small casserole
  • Squash the tomatoes down a bit with a wooden spoon, add the passata, garlic, bay leaf, chilli flakes, a little more olive oil, red wine vinegar and basil
  • Bring to simmering point on the simmering plate and transfer to the simmering oven for an hour or two for the flavours to meld and the sauce to thicken. You can leave it uncovered if you want it to thicken in less time than that
  • (Or simmer covered on a conventional hob at low temperature for half an hour to an hour, removing the lid towards the end if you feel it’s not thick enough)
  • Meanwhile cook the spaghetti until it’s al dente
  • Check the sauce for seasoning and toss the drained pasta in it
  • Serve with a drizzle of extra virgin olive oil and some freshly grated parmesan


Warm Salad of Griddled Chicken, Freekeh, Preserved Lemon, Sour Cherries and Mint

Warm Salad of Griddled Chicken, Freekeh, Preserved Lemon, Sour Cherries and Mint

The title for this recipe is very long, isn’t it? It’s another Diana Henry one but I’m making no apologies. I wanted to try freekeh (a cereal food made from unripened wheat which has been roasted and crushed into small pieces) because I’d never used it before so I pored over my various cookbooks and this was the recipe which appealed the most on the day. It’s perfect for the summer weather we’re having now. Instead of cooking the chicken in a griddle pan, you could barbecue it outside.

I’m enjoying the weather. We’ve barbecued twice this weekend, which has been lovely. My husband was supposed to be taking it easy after a small operation on Friday, but was up to standing at the grill while I got on with preparing vegetables and salads.

For the Chicken

Serves 4

  • 4 skinless boneless chicken thighs or breasts
  • 4 garlic cloves, grated or crushed
  • salt and pepper
  • juice of 1 lemon
  • 6 tbsp olive oil

For the Salad

  • 100g dried sour cherries
  • 2 preserved lemons
  • 200g freekeh
  • 1 tbsp olive oil
  • 4 tbsp extra virgin olive oil
  • 2 tsp honey (or maple syrup)
  • 3 tsp white balsamic vinegar
  • juice of ½ lemon
  • good pinch of ground cinnamon
  • laves from 10 sprigs of mint, torn
  • 10g chopped flat-leaf parsley

Method

  • If you are using breasts and they’re particularly thick, cut them in half horizontally. Marinate the chicken if you have time, even if it’s only for an hour or two. Mix the garlic, seasoning, lemon juice and olive oil in a dish and lay the chicken it it, turning it to coat. Cover with clingfilm and put in the fridge. Bring to room temperature before cooking
  • Place your griddle pan on the floor of the Aga roasting oven to get it really hot
  • Put the cherries in a small saucepan and add enough water to just cover. Bring to the boil on the boiling plate, then remove from the heat and leave to plump up for 30 minutes
  • Remove the flesh from the preserved lemons and discard. Cut the rind into slivers
  • Put the freekeh into a saucepan and cover with water, adding the regular olive oil and seasoning well. Bring to the boil on the boiling plate, then cover and transfer to the simmering oven for about half an hour, or until just tender. Drain
  • In a serving bowl mix the virgin oil, honey or maple syrup, white balsamic, lemon juice, cinnamon and plenty of salt and pepper. Add the drained freekeh and stir
  • Drain the cherries and fork them into the grains with the preserved lemon and most of the herbs
  • Place the heated griddle pan on the boiling plate and put the chicken on it (leaving the marinade behind)
  • Let it sizzle and splatter for two minutes, then turn it over. At this point you can place the griddle pan back on the floor of the roasting oven and leave the chicken to cook there for about 8 minutes until it’s cooked through. You can keep the griddle plan on the boiling plate and then move it to the simmering plate if you prefer but placing it in the oven minimises the amount of fat splattering everywhere
  • Taste the freekeh. You might want to add more lemon juice. The mixture should be moist and well-seasoned
  • Divide between four plates and serve the chicken on top or alongside, scattering the remaining herbs over. I served ours with some tzatziki

Our weekend in the garden:


Aubergine and Pea Curry

singin-in-the-rain-7438_1

So that’s it for another year and we can get back to normal, whatever “normal” is. The tree has been taken down and is currently awaiting collection in our front garden; all the decorations have been stored away in the spare room cupboard; and Sons 1 and 2 have returned to work, in Cambridge and London respectively. It was so lovely to have them at home, sometimes with and sometimes without the girlfriend of one and  the fiancée of the other, and although I should be used to it, I always feel a little sad when they’ve gone; not too sad, mind, because, as my mother says, if your children are happy to leave home, then you have probably done a good job as a parent. Son 3 stayed on for an extra couple of days which softened the blow, as much for his younger brother as for their parents. We all love films but Son 3 is the proper film buff of the family and at his suggestion we sat down on Monday evening to watch Singin’ in the Rain. I hadn’t seen it for years and had forgotten just how marvellous it is and what a wonderful actress the late Debbie Reynolds was: RIP. He returned to London with his dad yesterday, leaving youngest son and me, and Granny in her flat downstairs, in a very quiet house until the weekend.

Before he left I borrowed one of his Christmas presents to make supper: the book Fresh India by Meera Sodha, which is on the bestseller lists. Having eaten so much meat over Christmas we were all craving meat-free dishes and the aubergine and pea curry fitted the bill. The last thing I need is another cookbook but if this recipe is anything to go by, I might be adding this book to my birthday wish list.

Aubergine and Pea Curry

  • 5 tbps rapeseed oil
  • 1 teaspoon cumin seeds
  • 2 large onions finely chopped
  • 6 cloves of garlic, crushed
  • 4 large ripe tomatoes, chopped
  • 1 1/2 tbsps tomato purée
  • 1 1/2 level tsps salt
  • 1 1/4 tsps chilli powder (unless like mine, yours is very hot, in which case use less)
  • 1/2 teaspoon ground turmeric
  • 1 teaspoon sugar
  • 4 medium aubergines 1.2kg, chopped into 3cm cubes
  • 100g (I used 200g) peas (fresh or defrosted)
  • Put the oil in a wide-bottomed lidded pan on the simmering plate (conventional hob: medium heat). Once hot, add the cumin seeds and stir for 30 seconds. Add the onions and stir to coat in the oil. Cook (in the simmering oven) for 15-30 minutes until translucent but not brown.  Add the garlic and stir-fry for a couple of minutes
  • Add the tomatoes and purée and cover with a lid. Leave to cook for 5 minutes (or longer in the simmering oven), then add the salt, chilli powder, turmeric and sugar and cook for a further couple of minutes
  • Now add the aubergines, coating the pieces with the masala, pop the lid back on the pan and cook for around 10 minutes (or longer in the simmering oven). You want the aubergines to be tender and soft with little or no water running from them. If they’re watery or not yet tender, they may need another few minutes’ cooking
  • When they’re cooked, add the peas and cook for a couple of minutes
  • Serve with hot chapattis or plain boiled Basmati rice

NB:

  • I used one of those large round aubergines from Natoora. It weighed 620g and I was worried it would not be enough but it was plenty. Am therefore a little baffled by the aubergine quantity recommended in the book. Would it not have led to a very dry curry?
  • Also: I only used 5 cloves of garlic and 1 large onion.


Apologies that I don’t have a photo of this dish (but then nor does the book!). Instead here are a few photos of our Christmas.


Mince Pies

This post is not about telling you how to make mince pies.  To be perfectly honest, as I may have mentioned before, I don’t rate my pastry-making skills and would not presume to pass on any tips, because you are probably all much better at it than me.

That is not to say that I don’t enjoy having a go.  What is more, there’s nothing like making mince pies for getting into the festive spirit and family and friends do appreciate homemade ones.  One of the reasons I’ve made a few in the last week is that I found a big jar of Waitrose mincemeat in my cupboard with a “best before” date of December 2016.  You see?  I don’t even make my own mincemeat!

For the pastry I use this excellent Xanthe Clay recipe.  Sometimes I make “closed” pies (see above) and sometimes I cut out pastry stars to place on top (see below).  I always brush with egg and sprinkle with caster sugar.  I fancy making some with an almond crumble topping one day.  I bought some like that at Bristol’s wonderful Hart’s Bakery yesterday and would love to try to emulate them.  But that’s for another day.

In the Aga

Mince pies bake very quickly in the Aga roasting oven.  Place your tray of pies on the grid shelf on the fourth rung of the oven.  They will be done in 15 minutes at the most.  The oven is hotter at the back and on the side nearest the centre, so I turn the tray round halfway through the cooking time.


Norwegian Apple Cake

Norwegian Apple Cake


In this post a year ago I mentioned my Norwegian grandmother’s apple cake. It has become a Hardy family tradition to have it on Christmas Eve, but that doesn’t stop us having it at other times of the year. I have vivid memories of evening coffee time at my grandparents’ house in Oslo when cake would often be served.

I made the Norwegian apple cake this weekend for second son’s birthday. It’s not a typical birthday cake but I don’t think that matters. We managed to get his brothers to come along and gathered in London for tea and cake which we consumed while watching the England v Wales Six Nations rugby match. img_6492

I don’t think my grandmother, who is no longer with us, would mind if I gave you the recipe.  It’s extremely easy to make. You can keep it just as it is, or add cinnamon to the apples or sprinkle some flaked almonds over it, or both.

Norwegian Apple Cake

You will need a 20cm/8″ springform cake tin, greased and base-lined with greaseproof paper or bake-o-glide.

Conventional oven: pre-heat to 160º-170ºC

Ingredients

  • 4 Bramley apples
  • 125g plus 1 tbsp caster sugar
  • 125g butter, softened
  • 240g self-raising flour
  • 1 large egg

Method

  • Peel, core and slice the apples and place the slices in a bowl with the juice of a lemon to stop them going brown. Add the tablespoon of sugar
  • Place the apples in a saucepan with a little water, let’s say 3mm deep. Cook them for a minutes on the Aga simmering plate or your hob, giving them the occasional stir with a wooden spoon. When they’re all soft, remove from the heat and leave to cool
  • Make your cake batter by placing the sugar, butter, flour and egg in a bowl and beating the mixture. I use my electric mixer
  • Press two thirds of this mixture into the base of your prepared tinimg_4305
  • Then spoon the stewed apples over this but not right up to the edge. If you feel you have too much apple mixture (after all, Bramleys vary in size) save some (freeze it if necessary) to have with roast pork at a later date
  • On a floured surface very gently roll out the remaining third of the batter and then cut it into strips about 1.5cms wide
  • Arrange these strips in a lattice pattern over your cake. You don’t have to make a complicated over and under pattern. The dough is very soft and the strips might break as you pick them up. img_4306
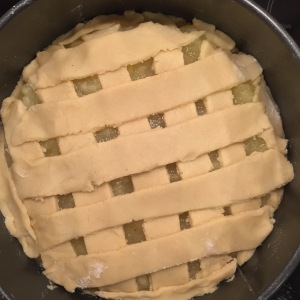
Don’t worry: you can just patch them together as you place them. As you can see from the photos, mine does not look remotely professional
  • Bake your cake until golden brown. You can’t test it because of the apples.  I find it usually takes between 35 and 45 minutes.  I start checking it at about 25.
  • You can serve it warm (but not piping hot) or at room temperature, dusted with icing sugar and cinnamon. I’m not a cream person but this cake really is best served with a dollop of lightly whipped cream.img_4319

Horseradish Sauce

For the first time in years I am alone on a Sunday.  Well, not completely alone since my mother-in-law is here, in her flat on the bottom floor of our house.  She’s worried that I’ve stayed behind because of her but while it’s true that she’s frail and we don’t like to leave her on her own, that’s not the case.  It was my choice and I’m enjoying the chance to catch my breath; I’ve never minded my own company.  My husband is on his annual Scottish fishing trip and youngest son’s in Cornwall with his brother and fiancée, staying with her family, and I’m just happy if everyone’s doing what they want to do.   I’ve mentioned before that we usually have Sunday lunch or supper with Granny, but she and I agreed there didn’t seem much point in doing a roast today.  I’m finding it quite liberating to be able to eat what and when I like.

So, although I’m not roasting anything myself today, I thought I’d tell you about this delicious homemade horseradish sauce I made last Sunday when there were six of us round the table for roast beef.  The same friends who gave us their homegrown courgettes had given us a piece of horseradish from their garden.  I’d never used it before and was delighted with this creamy, fresh-tasting sauce.

All you do is grate about 15g (more if you like extra heat) of horseradish and soak it in two tablespoons of hot water; drain, then mix it with one tablespoon of white wine vinegar, a pinch of mustard powder, salt and pepper and 150ml of lightly whipped double cream.

IMG_3654

Anonymity

Since starting a blog I’ve spent more time reading other people’s than writing my own.  Let’s say it’s in the interests of research.  I’m amazed at the variety of different styles out there, and it’s given me lots of ideas, but in the end my blog must be my own and not a poor imitation of someone else’s.

One thing about which I realise I have not been consistent and feel I should sort out before I go any further, is how to refer to my children, who are no longer children, let’s be honest.  I don’t plan to say much about them because I’m not sure they’d like me to, but it’s hard not to refer to them from time to time and I don’t want to use the Twitter shorthand I’ve adopted of Son1, Son2, Son3 and Son4.  So maybe I’ll do what a lot of bloggers do and use their initials, and ditto for other family members and friends who get a mention.  Will have to think of a way to get round the fact that youngest son and husband share their first initial (J).  J Senior and J Junior?  We’ll see.