Creamy Roasted Red Pepper Pasta

Creamy Roasted Red Pepper Pasta

You know when you read a recipe about char-grilling vegetables like peppers or aubergines which tells you to hold the vegetable over a gas flame and keep turning it until the skin is blackened and you think “I cannot do this because I have an Aga”? Well, I have discovered (you probably all knew this already) that placing the vegetable on a rack in a hot oven, ie the Aga roasting oven, has the same effect. I did it last night with red peppers and have done it with aubergines, as you can see in this recipe.

I wanted to make a pasta sauce using roasted peppers and cream, because I think they work very well together. So this is what I did.

Ingredients

(serves 2-3 people)

  • 3 red peppers (the Romano type would also work, possibly better, but you might need a couple more)
  • 2 tbsps olive oil
  • 1 fat garlic clove, crushed
  • Pinch of chilli flakes
  • 5 or 6 tbsps double cream
  • Fresh basil leaves
  • 200g of spaghetti or pasta of your choice

Method

  • Position the rack on the third set of runners in the roasting oven and place the whole peppers on it
  • Roast them for about 25 minutes, turning them halfway through (I used tongs)
  • Once they are nicely charred in places and soft place them in a dish or on a plate and cover with clingfilm; after half an hour or so it should be easy to remove the skins and deseed the peppers
  • Keep back half of one of the deseeded peppers, slice the rest and place them in a saucepan or sauté pan large enough to hold the pasta when it’s cooked
  • Cover and keep warm in the warming or simmering oven
  • Warm the olive oil in a small pan on the simmering plate and add the crushed garlic, taking care not to burn it, followed by the chilli flakes and cream; bring to the boil then remove
  • Combine the cream mixture and reserved half pepper in a blender or food processor, season and then add this sauce to the sliced peppers
  • Cook your pasta according to the packet instructions
  • Drain, reserving a ladleful of the cooking water, and add to the pepper mixture, loosening with the cooking water if you feel it needs it
  • Toss everything together with the basil leaves and serve

Smoked Salmon Quiche

Smoked Salmon Quiche

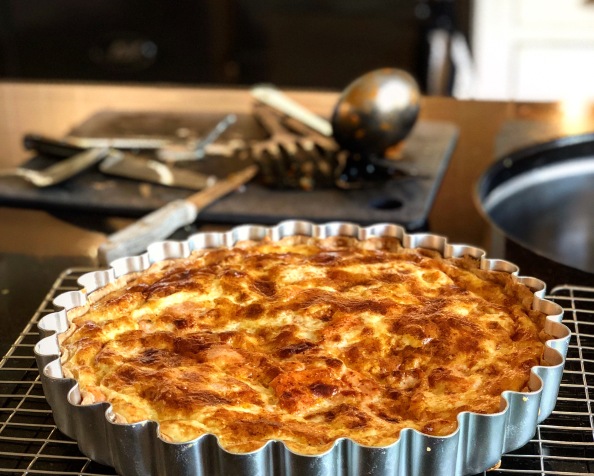
As we Aga cooks all know, cooking a quiche in an Aga couldn’t be easier because there is no blind baking required. You just have to add the filling to your pastry-lined tin and place the whole thing on the floor of the roasting oven to bake for 30 minutes or less. The pastry will cook from underneath avoiding a “soggy bottom”, as Mary Berry would tell you. The top will be golden brown.

The classic quiche is Quiche Lorraine made with bacon and Gruyère cheese, but there are so many variations you could try. For example, Diana Henry’s delicious salmon and crab tart with Thai flavours which I wrote about here.

Yesterday I made a simple smoked salmon quiche based on a Delia Smith recipe from her Complete Cookery Course. It was for a picnic for my husband and two friends who have been spending today salmon and trout fishing on the Usk. They also took with them roast asparagus dressed with olive oil and lemon juice, some mini pork pies (not homemade, I’m afraid), strawberries, rock cakes (my own), cinnamon buns (our favourite ones from Hart’s Bakery) and flasks of tea and coffee. They will not starve. I think I spotted a bottle of wine in the picnic basket too.

Smoked Salmon Quiche

Quantities here are for a 20cm fluted quiche tin, ideally with a loose bottom. Yesterday I doubled the quantities and used a 28cm tin. 

Ingredients

For the pastry:

  • 110g plain flour
  • 25g lard
  • 25g butter
  • a pinch of salt
  • cold water, to mix

For the filling:

  • 175 smoked salmon, chopped
  • 2 large eggs
  • 275ml double cream
  • freshly grated nutmeg
  • a dash of cayenne pepper
  • Salt and black pepper

Method

  • Lightly grease your tin
  • Make up the pastry by rubbing the fats into the flour and salt with your fingertips and adding a little cold water to combine. Rest it in the fridge wrapped in clingfilm for at least half an hour. Alternatively, use shop-bought pastry; I don’t mind one bit
  • Roll out the pastry on a floured surface and line your tin with it
  • Arrange the smoked salmon over the pastry base in the tin
  • Beat the eggs with the cream and add salt, pepper and some freshly grated nutmeg to taste
  • Pour the filling into the tin and sprinkle over a little cayenne pepper
  • Carefully slide the tin onto the floor of the roasting oven and bake for 20-30 minutes. Check it at 20 minutes and turn it round. When the pastry is golden and the filling is firm and golden brown, it is ready


Apple Streusel Pie

img_4280

At a shoot lunch towards the end of the season, my husband was served what he termed “the best pudding I’ve ever eaten”.  He loved it so much he asked his hostess, Clare Pelly, for the recipe so that he could make it at home.  Only joking; I mean so that I could make it for us all.  I don’t mind at all: I’m happy to be the cook in our relationship because I enjoy it and because I’m better at it than he is, just as there are many things I don’t like doing which he is happy to do and is better at than me.  I imagine this is how most successful partnerships work.

As it turns out, I’m very grateful to him for getting me the recipe for this “best ever” pudding because it’s absolutely delicious.  Clare is also an Aga cook and the pie is particularly suited to Aga cooking because it can be baked on the floor of the roasting oven, which gives wonderful, crisp pastry.

Ingredients

For 1 x 10″/26cm or 2 x 7″/18cm flan tins

Pastry:

  • 8oz/200g plain flour
  • 4oz/100g butter
  • 1 tbsp icing sugar
  • 1 egg yolk
  • 2 tbsp cold water

Filling:

  • 2lbs/900g cooking apples
  • 2oz/50g raisins
  • 4oz/100g plain flour
  • 4oz/100g caster sugar
  • 2oz/50g butter
  • 10floz/285ml double cream

Topping:

  • 2oz/50g caster sugar
  • 2tsp cinnamon

Method:

  • Pre-heat conventional oven to gas mark 6/200ºC
  • To make the pastry, sift flour, rub in butter, stir in icing sugar and bind together with yolk and water.  Wrap in clingfilm and place in the fridge for about 30 minutes
  • Roll out thinly and line your prepared tin(s) with it.  No need to bake it blind
  • Peel, core and slice  your apples and mix with the raisins
  • Make a crumble by sifting the flour, stirring in the sugar and rubbing in the butter
  • Spoon half of this into the tin
  • Cover with the apple/raisin mixture and pour over the cream
  • Spoon over the remaining crumble mixture and sprinkle on the topping
  • Bake on the floor of the roasting oven for about 30 minutes until it’s bubbling and caramelised or brûléed on top.  Your pastry should be lovely and crisp, although you won’t know this until you’ve cut into it
  • Conventional oven: after 25 minutes turn it down to gas mark 5/190ºC for 10 minutes
  • Can be served hot, warm or cold

Aga note:

I always worry about the Aga cooling down if you give it too much to do at once but yesterday I cooked a pheasant, some roast potatoes and this pie in the roasting oven in the space of one and a half hours and everything was perfectly cooked.

Cinnamon:

The first time I made this pie we were a little disappointed that the cinnamon flavour wasn’t very strong.  Cinnamon is one of my husband’s favourite things so he did a bit of research.  First of all he saw that the cinnamon I’d used (by Bart’s) was a blend “sourced from several Fairtrade producers” and that the cinnamon considered to be the best is from Ceylon.  So from the website cinnamonhill.com I bought some Ceylon cinnamon sticks and the next time I made the pie, we used the fine Microplane grater to grate some for the topping and reader, I can confirm it tasted noticeably better.

This slideshow requires JavaScript.

Norwegian Bløtkake

fullsizerender-2

This traditional Norwegian celebration cake (translation: soft cake) is part of my childhood in a way that no other food is. My grandmother, aunts, and mother all baked it regularly when I was growing up and then my mother passed the recipe on to me. Nowadays when we go on holiday to Norway, it’s my cousins who make the bløtkake and no doubt they have passed the recipe down to their children as I will to mine.

My mother is a great cook and loved introducing her British friends to Norwegian specialities, but when she was first married to my (English) father she also learnt to do an excellent Sunday roast and many other British recipes. She would make a bløtkake for our birthdays and if friends were coming round. For a few years she ran a small catering firm specialising in parties and weddings, and this cake was probably what her customers requested the most. I can remember helping her with deliveries sometimes which involved me sitting in the passenger seat of her car with the cake in a container on my lap, hoping we didn’t have to brake suddenly.

The cake is not complicated or difficult to make. It uses a fatless sponge so you needn’t feel guilty about the amount of cream required to make this cake delicious and special. I made it recently for my youngest son’s 18th birthday.

Ingredients

You will need an 8″ or 9″ springform cake tin, very lightly greased and base-lined.

  • 5 large eggs
  • 125g caster sugar
  • 125g self-raising flour
  • 300ml (or more) double or whipping cream
  • Fruit: strawberries, raspberries, blueberries or banana or combinations of these. I’m sure you will come up with other wonderful fruit ideas, depending on the season. The one above was a mixture of raspberries and blueberries. I also can’t give you quantities but I’m sure you’ll manage
  • Juice or milk for moistening the sponge

Method

  • Pre-heat a conventional oven to 150ºC
  • Whisk the eggs and sugar (ideally in a mixer or using an electric hand whisk) for 8-10 minutes (depending on the power of your whisk) until thick and very pale in colour. When you lift the whisk the mixture will leave a trail like a ribbon
  • Then fold in the flour; do this gently to keep in as much air as possible
  • Pour the mixture into your prepared tin and bake in the baking oven (see above for conventional oven temp) for about 25-30 minutes. Check it at 20 minutes and maybe turn it round so the other “side” is nearer to the back. If using a conventional oven, don’t even think about opening the door until it’s been in for 20 minutes. It is done if it springs back when pressed down gently with your finger
  • Cool on a rack for at least 10 minutes before turning it out of the tin. Leave it to cool upside down
  • When the cake is cold slice through the middle horizontally so you have two pieces. Even better, slice it into three layers.  In fact, I wish I’d done this for my son’s cake and will definitely do it next time. It makes a more impressive, moist and luscious cake. You may need more cream but given it’s a cake based on having lashings of cream, who’s going to quibble about that?
  • You need to moisten the sponge layers before filling the cake. You can use juice from the fruit (I had frozen raspberries which released a lot of juice after defrosting); or a little diluted elderflower cordial; or milk. We’re only talking about a couple of dessert spoonfuls
  • Whip the cream
  • Sandwich the cake together with the cream and fruit. Be generous with both
  • Finally, spread the rest of the whipped cream thickly over the whole cake and decorate with a little more fruit
  • It is customary to cut a circle in the middle of the cake and slice it from there. If it’s a birthday cake, the round piece can be saved for the birthday boy or girl

One more thing: if you don’t eat the whole cake at first sitting, and it is definitely best when fresh, make sure you store it in the fridge.

Update

My mother has read this post and passed on a tip which finishes the cake off nicely: keep back a little cream for piping round the bottom. As you can see from the photos, mine has a bit of a gap and would have been improved hugely if I had done this. What can I say, except I clearly haven’t inherited my mother’s knack for presentation.