Lemon and Ricotta Cake

Lemon and Ricotta Cake

The first lemon and ricotta cake I made was not a success. It was a Jamie Oliver recipe and didn’t really work, producing a rather dense cake. It may of course be entirely my fault and I might try it again one day. On the other hand, I’m not sure why I’d bother because yesterday I made a Diana Henry version from her book Simple and it was light and moist and delicious.

This cake works as an afternoon tea cake but also as a dessert served perhaps with some berries and crème fraîche or whipped cream. It’s best eaten slightly warm. It’s the ricotta that makes the cake moist but it also means it doesn’t keep that well. Don’t do what I did and make it on a day when hardly anyone’s around to share it with you because it really is best eaten on the day it’s made. If you do have some left, wrap it in clingfilm and refrigerate it. This is what I did and the next day I gave it a blast (a minute or two at high heat) in the microwave to warm it up a little and it freshened up beautifully. I was thrilled when our Italian friend, who is very particular about the food of his homeland and whose late wife was the most wonderful cook, gave it his approval.

Lemon and Ricotta Cake

Serves 8 (depending on hunger/greed)

You will need a 20cm springform tin, lightly greased and base-lined (with bake-o-glide)

Ingredients

  • 175g unsalted butter, softened
  • 175g golden caster sugar
  • Finely grated zest of 4 unwaxed lemons and the juice of 3
  • 3 large eggs, separated
  • 250g fresh ricotta, drained in a sieve
  • 100g self-raising flour, sifted
  • 25g ground almonds
  • 1 tsp baking powder
  • Icing sugar to serve

Method

  • Beat the butter and sugar together in an electric mixer until light and fluffy
  • Lightly beat the egg yolks with a fork and gradually add them, beating well after each addition
  • Stir the lemon zest and drained ricotta into the batter
  • Whisk the egg whites until they form medium peaks
  • Stir the lemon juice into the batter, then fold in the flour, almonds and baking powder
  • Fold two big spoonfuls of the egg whites into the batter to loosen it, then fold in the rest
  • Scrape the batter into the prepared tin
  • Put it in the baking oven and bake for 45-50 minutes; a skewer inserted into the middle of the cake should come out clean once it’s cooked
  • Leave to cool in the tin for 10 minutes or so, then remove the springform ring and let it continue to cool, although as I mentioned above it’s delicious served slightly warm
  • Dust with icing sugar to serve


Norwegian Bløtkake

fullsizerender-2

This traditional Norwegian celebration cake (translation: soft cake) is part of my childhood in a way that no other food is. My grandmother, aunts, and mother all baked it regularly when I was growing up and then my mother passed the recipe on to me. Nowadays when we go on holiday to Norway, it’s my cousins who make the bløtkake and no doubt they have passed the recipe down to their children as I will to mine.

My mother is a great cook and loved introducing her British friends to Norwegian specialities, but when she was first married to my (English) father she also learnt to do an excellent Sunday roast and many other British recipes. She would make a bløtkake for our birthdays and if friends were coming round. For a few years she ran a small catering firm specialising in parties and weddings, and this cake was probably what her customers requested the most. I can remember helping her with deliveries sometimes which involved me sitting in the passenger seat of her car with the cake in a container on my lap, hoping we didn’t have to brake suddenly.

The cake is not complicated or difficult to make. It uses a fatless sponge so you needn’t feel guilty about the amount of cream required to make this cake delicious and special. I made it recently for my youngest son’s 18th birthday.

Ingredients

You will need an 8″ or 9″ springform cake tin, very lightly greased and base-lined.

  • 5 large eggs
  • 125g caster sugar
  • 125g self-raising flour
  • 300ml (or more) double or whipping cream
  • Fruit: strawberries, raspberries, blueberries or banana or combinations of these. I’m sure you will come up with other wonderful fruit ideas, depending on the season. The one above was a mixture of raspberries and blueberries. I also can’t give you quantities but I’m sure you’ll manage
  • Juice or milk for moistening the sponge

Method

  • Pre-heat a conventional oven to 150ºC
  • Whisk the eggs and sugar (ideally in a mixer or using an electric hand whisk) for 8-10 minutes (depending on the power of your whisk) until thick and very pale in colour. When you lift the whisk the mixture will leave a trail like a ribbon
  • Then fold in the flour; do this gently to keep in as much air as possible
  • Pour the mixture into your prepared tin and bake in the baking oven (see above for conventional oven temp) for about 25-30 minutes. Check it at 20 minutes and maybe turn it round so the other “side” is nearer to the back. If using a conventional oven, don’t even think about opening the door until it’s been in for 20 minutes. It is done if it springs back when pressed down gently with your finger
  • Cool on a rack for at least 10 minutes before turning it out of the tin. Leave it to cool upside down
  • When the cake is cold slice through the middle horizontally so you have two pieces. Even better, slice it into three layers.  In fact, I wish I’d done this for my son’s cake and will definitely do it next time. It makes a more impressive, moist and luscious cake. You may need more cream but given it’s a cake based on having lashings of cream, who’s going to quibble about that?
  • You need to moisten the sponge layers before filling the cake. You can use juice from the fruit (I had frozen raspberries which released a lot of juice after defrosting); or a little diluted elderflower cordial; or milk. We’re only talking about a couple of dessert spoonfuls
  • Whip the cream
  • Sandwich the cake together with the cream and fruit. Be generous with both
  • Finally, spread the rest of the whipped cream thickly over the whole cake and decorate with a little more fruit
  • It is customary to cut a circle in the middle of the cake and slice it from there. If it’s a birthday cake, the round piece can be saved for the birthday boy or girl

One more thing: if you don’t eat the whole cake at first sitting, and it is definitely best when fresh, make sure you store it in the fridge.

Update

My mother has read this post and passed on a tip which finishes the cake off nicely: keep back a little cream for piping round the bottom. As you can see from the photos, mine has a bit of a gap and would have been improved hugely if I had done this. What can I say, except I clearly haven’t inherited my mother’s knack for presentation.

Carrot Cake


IMG_0729

I thought it might be fun to do a “weekend bake” post every Friday, but then I remembered I’ve never got into the habit of baking a cake specifically for the weekend. I just bake when I feel like it, when I’ve got a bit of time and (very important this) when I know there are enough people around to eat my offering before it goes stale. There was a time when I’d bake something at least twice a week for when the children returned home from school.

Yesterday I saw a window and, having checked that I had all the ingredients in the pantry (I haven’t got a pantry but you know what I mean), I put my apron on and went for it.

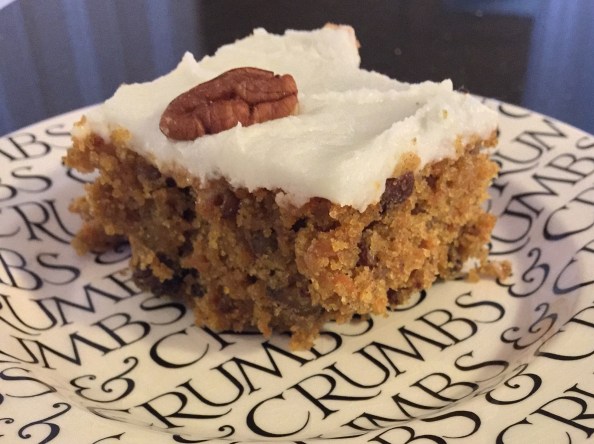
I made Geraldene Holt’s carrot cake, which featured on Woman’s Hour two or three years ago. Unfortunately, it doesn’t appear to be online anymore and I haven’t got her cake book, so I am very glad I had saved the recipe to Evernote. I’m no carrot cake expert but I do know that today’s incarnations are American in origin. Holt’s recipe veers a little from that by using melted butter instead of oil, but otherwise it seems to me to be authentic, all the way to the cream cheese frosting.

Ingredients

  • 150g butter
  • 200g light muscovado sugar
  • 175g carrots, grated as finely as you can (I don’t bother to peel them but feel free to do so if you prefer)
  • Finely grated zest of half an orange
  • 2 eggs
  • 200g self-raising flour
  • 2 tsp baking powder
  • 1 tsp ground cinnamon
  • 1/2 tsp ground coriander
  • 1/2 tsp grated nutmeg
  • 1/2 tsp salt
  • 120g seedless raisins
  • 60g pecans, chopped (or walnuts)
  • 3 tbsp milk

For the frosting

  • 45g cream cheese
  • 175g icing sugar
  • 1-2 drops vanilla extract

Method

  • Butter and base-line (I use bake-o-glide) a 9 inch/23cm square tin
  • Melt the butter in a small bowl on the back of the Aga, or in a mixing bowl in the microwave
  • Beat the sugar, carrots, orange zest and eggs together with the melted butter
  • Fold in the flour sieved with the baking powder, spices and salt
  • Add the raisins, pecans and milk and mix until well combined
  • Tip the mixture into the prepared cake tin and level with the back of a spoon
  • Bake in the baking oven, with the rack on the floor of the oven, (or at 180ºC in a conventional oven) until the cake is springy in the middle and a skewer comes out clean. It takes just 30-35 minutes in my Aga. Holt gives a baking time of 60 minutes
  • Cool in the tin for 5 minutes, then turn out onto a wire rack to cool
  • To make the frosting, beat the cream cheese until smooth, then gradually blend in the icing sugar until it’s spreadable. Add vanilla extract and spread over the cake. This makes a thin layer of icing, which is plenty, but this time, I used up the cream cheese I had left in the pot which turned out to be 75g. I just kept adding icing sugar until I felt the frosting was the right consistency. I know it’s naughty and unhealthy, but I enjoyed the cake even more with the thicker layer of frosting. As you can see, I “decorated” mine with pecan nuts.

This can be eaten straight away or left for a couple of hours to let the frosting set. To serve, cut it into squares.

IMG_2536