Sticky Almond Cake

IMG_3164

It is said that marzipan is a bit like Marmite in that you either love it or hate it. I absolutely adore it and hence this cake, which comprises a thick layer of the stuff in the middle. This is the reason for the “sticky” in the title. Cakes made with ground almonds tend to be deliciously moist anyway, but the addition of marzipan takes it to a whole new level. I made this cake for my book club last week and received compliments and requests for the recipe. Even my husband, who normally doesn’t like marzipan, loved it.

This cake can also be seen as relief from the relentless EU referendum debate. At last the day has finally arrived and all we can do is cast our votes and wait for the result. In a conversation with a Twitter mate, the other day, we bemoaned how nasty conversations had become, with people who normally share similar political outlooks finding themselves on opposite sides. She and I decided we’d change the subject and discuss recipes instead, and that is how I’ve come to be writing about this cake. So, @soyoprincess, this is for you.

Sticky Almond Cake

Ingredients

  • 225g butter
  • 225g caster sugar
  • 4 large eggs
  • 50g plain flour
  • 150g ground almonds
  • 350g marzipan (white, preferably)

Method

  • Grease and base-line (with bake-o-glide or parchment) a 23cm springform cake tin
  • Place the butter, sugar, eggs, flour and ground almonds in a bowl and beat until thoroughly mixed.  I did this in my KitchenAid mixer but an electric hand whisk will also do the job
  • Roll out the marzipan to the size of your cake tin and using the tin as template, cut in a circle
  • Place half the mixture in the tin and top with the marzipan, then cover with the remaining mixture
  • Bake in the baking oven, or conventional at 180ºC. Start to check it at 45 minutes and cover with foil or parchment if necessary. It’s ready when it’s firm to touch. Sorry to be vague but this can take an hour or as long as an hour and a quarter
  • Cool in the tin for 5 minutes and then remove to a rack
  • Dust with icing sugar before serving
  • This cake keeps for several days; in fact, it improves with age


Film Club Supper alla Bolognese

I belong to a little film club comprising eight friends.  We meet every six weeks or so and take it in turns to host.  The hostess (yes, we are all female) chooses the film and makes supper which we eat at the start of the evening, usually, but not always, sitting at a kitchen or dining room table.  Pudding and/or chocolates tend to be consumed on the sofa while watching the film.  We are allowed to pause the film for loo breaks, to make tea and coffee or to comment on or ask each other questions about the film.  It’s great fun.

We’ve watched a wide range of films over the years, both foreign language and English.  It was my turn to host our last meeting and I chose the film Carol with Cate Blanchett and Roony Mara.  I always mean to go to the cinema to see the Oscar nominated films but invariably don’t get around to it, so film club presents an excellent opportunity.  And it’s so easy to watch films these days.  On this occasion all I did was log on to Amazon Instant Video to rent the film and within seconds it was available to watch.

We liked the film very much.  It is beautiful and moving and Cate Blanchett’s performance is every bit as good as one has come to expect.  But I will leave film reviews to others and move on to important matters like the food!

Supper was Rick Stein’s Bolognese sausage ragù with tagliatelle.  I’d recently watched his programme from Bologna in which he’d toured that city’s food markets and restaurants.  It had transported me back to a wonderful holiday we’d enjoyed in that region of Italy when we’d also discovered its delicious cucina.

During the programme Stein made the ragù and I decided there and then to make it for film club.  My guests were too polite to say so but I know it was a little dry.  I was trying not to add too much wine/stock/cream to adjust for the fact that, as I’ve mentioned before in this blog, Agas are brilliant at retaining moisture.  But I went too far and felt we could have done with a little more creaminess to coat the strands of tagliatelle.  The flavour, however, was superb: with the aroma of fennel, rosemary and chilli, we could almost have been in Bologna.  I will definitely be making it again soon and might update this post if I get the liquid:sausagemeat ratio right next time, but for  now, here’s the recipe with my suggestions based on my experience.

By the way, I made double the BBC recipe linked to above (there were seven of us eating that night) and cooked, I felt, a little too much tagliatelle (750g).  I didn’t add all of it to the ragù but there was still plenty; nor did I emulate Rick Stein and make my own pasta.  I chose this very good quality one by  “Artigiano Pastaio” which is not cheap but worth it for a treat.

Finally, at the last minute, with my friends arriving on the doorstep, I remembered just in time to take a few photos.   Taking photos of the food needs to become second nature to me and I must learn to ignore my family when they roll their eyes at me for holding up the meal in order to take pics, or I won’t be able to call myself a blogger.

Ingredients

(For 4 people)

  • 400g fresh or good quality dried tagliatelle (or homemade as per Rick Stein’s recipe)
  • 400g sausagement
  • 1 tbsp olive oil
  • 1 medium onion, chopped
  • 2 sticks celery, chopped
  • 3/4 tsp fennel seeds, roughly ground in pestle and mortar
  • 1/4 tsp chilli flakes
  • 1 sprig rosemary, leaves finely chopped
  • I large clove garlic, crushed
  • 150ml dry white wine
  • 150ml chicken stock
  • 150ml double cream
  • Salt and pepper
  • Grated parmesan to serve

Method

  • Heat the oil in a large casserole on the boiling plate and break up the sausagemeat into it.  Cook for about 10 minutes, stirring all the time, moving it to the simmering plate if it seems too hot
  • Add the onion, celery, fennel seeds, chilli flakes and rosemary and cook for about 15 minutes until the onion is soft.  You can do this in the simmering oven, maybe for a little longer than 15 minutes
  • Add the garlic, give it a stir and then pour in the white wine.  Cook for 10 minutes or so on the simmering plate until it’s reduced.  Then add 100ml of stock and 100ml of cream, season, let it come to a simmer then cover with a lid.  Cook in the simmering oven for 30 minutes or so and take a look.  If you think it looks a bit dry add the rest of the stock and cream.
  • You can leave it for an hour or two in the simmering oven.  When you’re nearly ready to eat, cook the tagliatelle according to packet instructions and when it’s al dente, drain, add it to the ragù and mix it in.

Serve with a dressed green salad.

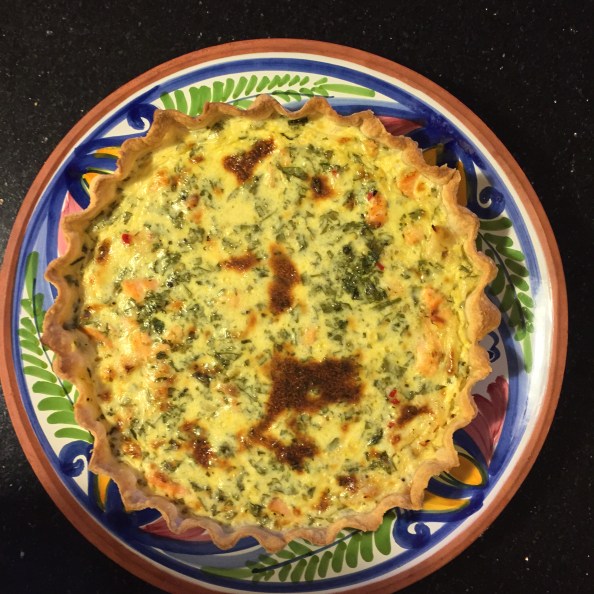
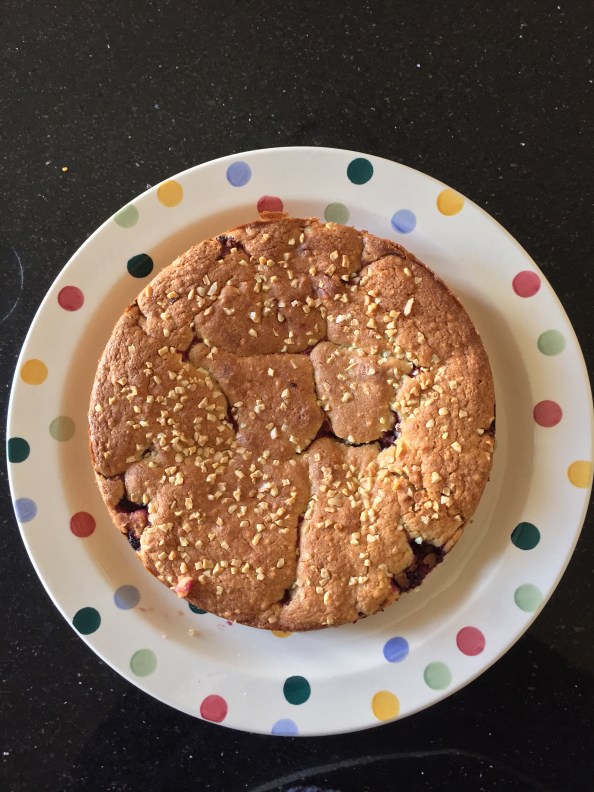
I haven’t posted for a while so here are photos of other things we’ve been eating lately.  First, I made Mamma Moore’s apple cake again, but this time with rhubarb, of which my allotment-owning sister-in-law brought a whole load when she visited recently.  It worked superbly; rhubarb and ginger have a real affinity.

And then last night we had the simplest of seasonal dishes: trout caught the night before by my husband’s friend, baked in the oven with lemon juice, butter and parsley and accompanied by Jersey Royal new potatoes, carrots and fresh peas.

Tarts and Scones

IMG_2778

Making tarts or quiches in an Aga could not be easier because you do not have to bake the pastry blind.  Take the tart above, which I made on Friday.  I used this recipe by Diana Henry but was able to omit several stages and go straight from chilling the lined tart tin to adding the filling and baking it.

On this occasion I didn’t even make the pastry myself.  I bought some good quality all butter shortcrust in sheets, which meant minimal rolling out was required.  Once I’d lined my tin with it, I put it in the freezer to firm up, as Diana advises, but I did not prick the pastry with a fork; this is not necessary if you are not baking it blind.

I’m not sure how long mine was in the freezer for, but probably no longer than half an hour.  I did a bit of washing up (I’m one of those cooks who clears up as she goes along) and prepared the filling while this was happening.  So then all I had to do was put the crab/salmon/Thai ingredients in the pastry case and pour over the cream/egg mixture and cook my tart.  This I did by placing it straight onto the floor of the Aga roasting oven and leaving it there for about thirty-five minutes.  I checked on it after twenty though.  It was done when the filling was golden and no longer wobbly.  I removed it and let it rest while I roasted some new season English asparagus to go with it.  A nice green salad would have been a good accompaniment too.  We thought this tart was delicious.  I have resolved to make more such things during the summer.  A tart makes excellent picnic food and if you have any left over, it keeps well in the fridge and is available for any peckish moments.  I’ve just remembered a rather delicious smoked salmon one I used to make.  Must dig out the recipe.

On Saturday I did absolutely no cooking, which was a treat.  We were in London for the day and went out for a lovely family lunch at our favourite Italian restaurant, fittingly called La Famiglia.  The reason for the gathering was that one of my cousins had come over from Norway to visit his aunt, my mother.  All my boys were able to join us and together with one girlfriend and one fiancée there were ten of us round the table.  My husband, youngest son and I didn’t get back to Bristol until about 8.30 in the evening (in time to catch most of Eurovision).  We weren’t really hungry but managed to squeeze in a little slice of the tart all the same.

On Sunday afternoon I made scones for afternoon tea.  I cannot think of anything quicker to bake than scones and I just love them.  The recipe I chose was this one by Thane Prince which uses buttermilk.  The scones are light and not at all rich.  If you want a richer scone, there are plenty of recipes which use eggs, like this Mary Berry one.

Update: BBC Food Website

Following the devastating news today that the BBC is to remove all 11,000 recipes from its food website, I need to update this post.  The Mary Berry scone recipe link above will soon no longer function.  It was probably a bit lazy of me merely to give you a link anyway, so I’m giving you below one of her scone recipes in full.  It’s one I’ve used many times.  And don’t worry, I have no plans to remove any recipes from my blog so it will be here for you to use forever!

Mary Berry’s Very Best Scones

  • Makes about 20
  • Pre-heat conventional oven to 220ºC
  • You will need two large baking trays, lightly greased or lined with bake-o-glide

Ingredients

  • 450g SR flour
  • 2 rounded teaspoons baking powder
  • 75g butter, at room temperature
  • 50g caster sugar
  • 2 large eggs
  • about 225 ml milk

Method

  • Sieve the flour and baking powder into a large bowl and rub the butter into it with your fingertips, until it resembles fine breadcrumbs.  You can pulse this in a food processor if you prefer
  • Stir in the sugar (and pulse again if using food processor)
  • Beat the eggs together and make up to a generous 300ml with the milk, then reserve 2 tablespoons of this for glazing the scones later
  • Gradually add the egg mixture to the dry ingredients, stirring it in until you have a soft dough.  Again, this can be done in a processor
  • The mixture should be on the wet side, sticking to your fingers, as the scones will rise better
  • Tip the dough onto a lightly floured surface and flatten it out with your hand to a thickness of 1-2 cms.  Use a 5cm fluted cutter to stamp out the scones by pushing the cutter straight down into the dough (as opposed to twisting it), then lifting it straight out
  • Gently push the remaining dough together, knead very lightly, then re-flatten (you could use a rolling pin) and cut out more scones
  • Arrange the scones on the baking trays and brush the tops with the reserved beaten egg mixture to glaze
  • Bake, one tray at a time, with the tray on the third rung in the Aga roasting oven, or in the pre-heated conventional oven, for 10-15 minutes, until well risen and golden
  • Transfer to a wire rack and leave to cool


Orange and Poppy Seed Cake

IMG_1522

For some reason I haven’t done any baking for a while. It might be because there have only been three of us to feed most of the time but that’s not usually sufficient reason. If I don’t want a cake to go stale before we’ve finished it, I bake a small one or perhaps some cookies, scones, muffins or individual cakes like these rock cakes, so I can put some in the freezer.

My son and his fiancée have just moved into their first flat together. They don’t own it of course – what young couple can afford a mortgage nowadays? – but they’re very happy and excited and it’s made me very happy on their behalf. It’s also reminded me of what it was like when my husband and I started out. They have very little so I’ve gone through some of my cupboards, digging out glasses, crockery and other items we no longer use and my husband found them a very nice pine table in our garage. They only have one bedroom so they sensibly bought a sofa bed for the living room. This has still not been delivered (a frustrating tale which my Twitter followers might be aware of) but it will arrive next week and their little home will be more or less complete.

Anyway, I digress. Perhaps it was all the vicarious home-making activity that led me to bake a cake today. I opted for a recipe for an orange and poppy seed cake recipe from the Nordic Bakery Cookbook. I don’t think I’d ever made a cake with poppy seeds before but at a café in Bristol recently, youngest son raved about the lemon and poppy seed cake so I thought he might be pleased to find something similar waiting for him on his return from school this afternoon. I was right. We both love the cake and have decided that simple Nordic cakes like this are our favourites: no icing or decoration of any kind; just wholesome and declicious.

Here’s the recipe, which I tweaked a little. I don’t like an overpowering vanilla flavour (a legacy from being forced to eat lumpy custard at school in the cruel 1960s) so I used 2 teaspoons here instead of 3. I also used the all-in-one method to mix the batter. I find it works for most cakes, and is much quicker, obviously.

Orange and Poppy Seed Cake

You will need a 20cm/8inch round cake tin, greased

Ingredients

  • 300g unsalted butter, at room temperature
  • 250g caster sugar
  • 2 teaspoons vanilla extract
  • 5 eggs
  • 3 tsps baking powder
  • 300g plain flour
  • Grated zest of 1 1/2 oranges
  • Freshly squeezed juice of 1/2 orange
  • 1 tbsp poppy seeds

Method

  • (Heat conventional oven to 180ºc)
  • Beat together the butter, sugar, eggs, flour, baking powder and vanilla in a mixer (I used my KitchenAid) or using an electric hand whisk
  • When the mixture is light and fluffy, fold in the orange zest, juice and poppy seeds until well mixed
  • Spoon the mixture into the prepared tin and level the top with the back of the spoon
  • The cake is done when a skewer inserted in the centre comes out clean
  • You may want to put a piece of greaseproof paper over the cake at some point. I did this at 40 minutes because the top of the cake was looking rather dark
  • I baked this in the Aga baking oven for 65 minutes and it was perfect. The original recipe recommends a bake of 50-60 minutes in a conventional oven

Wheat Intolerance and Spelt Flour

Now I’m as sceptical as the next person about the so-called food intolerances and allergies of the modern world, but there’s no doubt about it, many people report feeling unwell or at best uncomfortable if they eat foods containing wheat, and prefer to steer clear of them. A friend staying recently is one such person. She isn’t coeliac so gluten’s fine, but she has discovered over the years that she’s less likely to have stomach aches and feel generally unwell if she doesn’t eat bread, pasta and cakes. Unless, that is, they are made using spelt flour. Spelt is an ancient grain with a unique gluten structure which makes it easier to digest; at least, that’s what it says on my packet. I made the orange and poppy seed cake when she came, but this time substituted spelt flour for plain flour. And, guess what, it turned out the same! Okay, so maybe it was just a tiny bit denser, but it’s possible that, being so determined to find something different about it, I completely imagined this.

Lemon and Poppy Seed Cake

When I substituted lemon for orange in the cake I was very pleased with the result. It was a good way to use up some of the lemons left over from making my son’s birthday cake. I added the juice of two lemons and the zest of one, which produced a subtle lemon flavour. If you wanted a stronger flavour, you could add the zest of a further lemon.


Baking with Raspberries


I don’t see myself as much of a maker of puddings or desserts; I’m nervous about pastry and anyway, during the week there simply isn’t time to make a dessert.  In all honesty I’d rather bake a cake to have with a cup of tea in the afternoon and then just eat some chocolate to satisfy my sweet tooth at the end of a meal.  But, as I wrote here, I’m not eating chocolate anymore.

On Sundays, as I think I’ve mentioned before, my mother-in-law usually makes a pudding for us all.  I’ll make one if we have friends round or to take to friends if we’re invited to lunch or supper.  I’ll also make a dessert when it’s my turn to host book club or film club.

Raspberry and Cinnamon Torte

The raspberry and cinnamon torte I wrote about in my tumblr days is one of our favourites:

Bakewell Cake

This bakewell cake by Fay Ripley, which my Twitter friend @lesleyj28 alerted me to recently, could serve as a dessert or a teatime cake.  I pounced on the recipe because it contains everything that’s delicious and good about a bakewell tart (almonds, raspberry jam!) but no pastry.  I love pastry but (see above) don’t love making it.  Without the need to make pastry, this cake is mixed and baked in no time.  I used to watch Fay Ripley in Cold Feet on the telly (LOVED it) and had heard about her recipes but had not tried them before.  As I began to make this, I realised how similar it is to my torte.  It is a little more “cake-y” (two eggs instead of one), has jam in it and doesn’t contain cinnamon but apart from that it’s the same.  In fact, if I made it again, I’d probably replace the vanilla extract with cinnamon, but that’s just my personal preference.  Also – a small point – I didn’t have any flaked almonds in the cupboard so scattered over chopped almonds instead: a poor compromise on Fay’s recipe, we later all agreed.

Ingredients

  • 150g butter, softened
  • 150g golden caster sugar
  • 150g SR flour
  • 150g ground almonds
  • 2 large eggs
  • 1 tsp vanilla extract
  • 6 tsp raspberry jam
  • 150g raspberries (I used frozen because it was all I had)
  • 50g flaked almonds

Method

  • Grease a 22cm springform tin and base-line with bake-o-glide or baking parchment
  • In a mixer, food processor or with an electric hand whisk combine the butter, sugar, flour, almonds, eggs and vanilla extract (oh how I love the all-in-one method!)
  • Place half the mixture in the cake tin, smoothing it out, and dot the raspberry jam over, half a teaspoon at a time.  Scatter the raspberries over
  • Drop spoonfuls of the remaining mixture over the fruit but don’t worry if there are gaps; it will spread in the oven
  • Scatter over the flaked almonds
  • Bake for about 40 minutes in the Aga baking oven (or a little longer in a conventional oven at 180ºc).  Not easy to test this cake with a skewer because the raspberries make it a little wet in the middle.  It should be golden brown and springy to touch when done

Couldn’t be simpler.


IMG_2705


Raspberry Muffins

I love making raspberry muffins too, although I see them as more of a coffee or teatime thing than a dessert.  I also wrote about these on my tumblr:

Cavolo Nero

4f3d21f62542b_cavolo_nero


Cavolo nero is a cousin of kale and both belong to the brassica family.  Its long leaves are so dark green in colour, they’re nearly black or “nero”.  It originates from Tuscany where it was first believed to be grown in 600BC.

I can’t say when it first started to appear in our greengroceries and supermarkets but it doesn’t seem like long ago.  Since I first discovered it, relatively recently, I’ve used it mainly in minestrone and in pasta dishes.  It has a deliciously rich and intense flavour.

Not surprisingly, cavolo nero works well in pasta dishes and this recipe by Stevie Parle, which appeared in the Telegraph a couple of years ago, is delicious.

Ingredients

  • 500g penne
  • 300g cavolo nero (you can strip the leaves from the stem if you like but since it’s going to be puréed I don’t think it’s necessary. I just chopped mine up.)
  • 2 garlic cloves, peeled
  • 3 tbsp pine nuts, lightly toasted
  • 150ml extra virgin olive oil
  • Grated parmesan to taste

Method

  • Bring some salted water to the boil with the garlic cloves in a large saucepan and add the cavolo nero.  Cook for 5-10 minutes until tender and drain, keeping the garlic cloves
  • Transfer this and the pine nuts to a food processor and blitz.  Add the olive oil and parmesan (maybe a couple of handfuls), process again and season.  You will have a dark green sauce
  • Meanwhile bring another pan of water to the boil and cook the penne according to packet instructions
  • Drain the pasta, reserving a ladleful of the cooking water, return it to the pan and toss with the sauce, loosening it with some of the cooking water
  • Finish with a drizzle of olive oil and serve with more grated parmesan


Fricassée of Chicken with Tarragon


IMG_4660

This morning I tweeted a line I’d read in the Sunday Times about the Sunday roast being on its way out but that this wasn’t the case in my house.  Wonderfully, the replies I received confirmed that my family is not the exception.  It doesn’t have to be eaten at lunchtime (everyone’s Sundays are busy) but I believe it’s a ritual and tradition worth preserving.

When I was a student and sharing a flat with three friends, where cooking was concerned we had the typical student repertoire of the era, comprising 1001 things to do with mince. But believe it or not, one of our staples was also chicken fricassée.  I’m afraid I can’t remember the recipe in detail but it wasn’t like the dish I made for Sunday lunch today. Our student recipe involved sautéeing pieces of chicken and mushrooms and then adding a little flour, stock and milk (and possibly some cream) to make a white sauce.  We used to serve it with rice.

The origin of the term “fricassée” is French, possibly from “frire” (to fry) and “casser” (to break in pieces), which might explain why all the fricassée recipes I found in a quick Google search this afternoon used chicken pieces rather than a whole bird.  The one I made for lunch today, based on this recipe by Michel Roux which I read in the Times during the week, is the only one I’ve seen which involves roasting a whole chicken.  (Apologies if you’re not a Times subscriber and the article is behind the paywall.)

Anyway, we really enjoyed it; the tarragon sauce is delicious.  Sometimes it’s good to return to a simple classic.  We don’t need always to be finding the next fashionable thing to cook.

I made changes to the Roux recipe; very brave of me, I thought, considering his chef’s credentials and renown, but I honestly didn’t think we needed quite that much cream and also, when you have a roasting oven as hot as the Aga’s, why would you need to brown the chicken before putting it in the oven?

Ingredients

  • 1 whole chicken (mine weighed 2kg)
  • Butter
  • 3 shallots
  • Tarragon vinegar (I didn’t have any so used good quality white wine vinegar)
  • About 100ml white wine
  • About 100ml chicken stock
  • About 150ml double cream
  • Handful of tarragon leaves (adjust amount according to your preference)

Method

  • Place the chicken in a roasting tin, spread butter all over it and season.
  • Roast in the roasting oven for about 1 hour and 20 minutes, basting a couple of times during cooking.  I placed mine on the rack on the third set of rungs for the first 20 minutes, then moved the rack to the bottom of the oven with the tin on the fourth set of rungs.  The cooking time will obviously depend on the weight of your chicken.
  • Remove the chicken, place on a dish and leave to rest (perhaps on the warming plate of your Aga)
  • Pour off most of the fat, add a knob of butter and sweat the shallots gently for about 5 minutes.  Add 1tbsp vinegar and the white wine and let it bubble up for a few minutes.  At this stage I poured everything into a small saucepan: easier than continuing in the roasting tin.
  • Add the chicken stock and boil until reduced a little.  Add the cream and repeat.  Check for seasoning.  Add the tarragon leaves at the last minute.  Pour into a jug for serving.  We ate our fricassée with new potatoes, broccoli and carrots.


Simnel Cake

Simnel Cake

Why not make this delicious fruit cake for Easter? As you probably know, simnel cake was originally baked for Mothering Sunday in the middle of Lent; girls in service would make one to take home to their mothers. I love it because it’s a fruit cake and lends itself to being baked slowly in the Aga, which makes for a very moist cake. Then there’s the marzipan which I adore almost as much as chocolate, and that’s saying something.

Last year my son’s lovely girlfriend made us a simnel cake, so we had two. No-one was complaining. The only problem for me was that she raised the bar and made her own marzipan, and now my youngest son says he doesn’t like shop-bought marzipan at all and suggested I make mine too. It really isn’t difficult and actually doesn’t take very long if you have a food processor.

Marzipan

This will make more than you need for the cake but I adore marzipan and was happy to have some left over. Disclosure: marzipan quantities given here are approximate. The balls on top can be as big or small as you like. The top circle can be as thick as you like. If you don’t want to make your own, I suggest you buy a 450g packet of marzipan.

  • 450g icing sugar
  • 450g ground almonds
  • 2 eggs
  • 1 1/2 tsps brandy
  • Juice of a lemon
  • 1/2 tsp almond extract
  • Simply  blitz all the ingredients in a food processor until it’s come together nicely
  • Tip this out onto a dusting of icing sugar on your worktop and knead it for a bit
  • Flatten it slightly, wrap it in clingfilm and put it in the fridge until you’re ready to use it

Simnel Cake

I used a Mary Berry recipe except that instead of placing a circle of marzipan in the middle of the cake, I folded small pieces of it into the mixture, à la Delia’s recipe.

Ingredients

  • 100g natural glacé cherries
  • 225g softened butter
  • 225g light muscovado sugar
  • 4 large eggs
  • 225g self-raising flour
  • 225g sultanas
  • 100g currants
  • 50g chopped candied peel
  • Zest of a lemon (MB says 2 lemons, but I didn’t want it too lemony)
  • 2 level tsps mixed spice
  • 200g marzipan, cut into small squares or rolled into balls and tossed in a little flour

Topping

  • 225g marzipan
  • 2 tablespoons of apricot jam
  • 1 large egg, beaten, to glaze

Method

  • Pre-heat a conventional oven to150ºC/Fan 130ºC/Gas 2
  • Grease a 20cm deep round cake tin, then line the base and sides with baking parchment or bake-o-glide
  • Put the cherries in a sieve, rinse under running water, drain and dry on kitchen paper. Cut into quarters
  • Measure all the cake ingredients into a large mixing bowl, except for the fruit and marzipan, and beat well until thoroughly blended. (I used my KitchenAid)
  • Fold the fruit into this mixture and then finally the pieces of marzipan
  • Spoon the mixture into your prepared tin and level the surface
  • Bake in a conventional oven for about 2.5 hours or the Aga simmering oven for 4-5 hours. This really depends on your Aga. The important thing is the cake is coming away from the sides a little, is well risen, evenly brown and firm to the touch
  • Leave to cool in the tin for 15-30 minutes
  • When the cake is completely cool, brush the top with a little warmed apricot jam and roll out marzipan to make a circle to fit the top. Press firmly on the top and crimp the edges to decorate. (You will see from my photos I made a bad job of this. You will do better.)
  • Mark a criss-cross pattern on the marzipan with a sharp knife. Form the remaining marzipan into 11 balls (representing the apostles minus Judas)
  • Brush the almond paste with beaten egg and arrange the balls around the edge of the cake
  • Brush the tops of the balls with beaten egg and then place the cake in the roasting oven (or under the grill) for 3 or 4 minutes, near the top, to turn the marzipan golden


Casseroles

IMG_2078


Spring was definitely in the air last weekend.  It was still chilly, especially in the early morning and evening, but when the sun was shining one could actually feel the heat from it.  Early Spring blossom has started to appear on the trees in Bristol and the daffodils are very much in flower.  So it might seem odd that I chose to cook rather wintry, comfort food dishes, but I thought I’d better get them in before temperatures really do rise.


Lancashire Hotpot

My husband says I can’t possibly write a post about this meal because we didn’t take a photo of it, but, with apologies for the lack of illustration, I’ve decided to do it anyway.  It was a success and the ideal thing to cook last Saturday when I had plenty of time in the morning but wanted to watch England play Wales in a crucial Six Nations rugby match in the afternoon.  Honestly, as you will see, this hotpot is more or less just an assembly job.  While I was preparing it I managed to keep an eye on the Italy v Ireland match.

For the ingredients, I more or less followed Felicity Cloake again and make no apologies for that.  Here is what I did.

Ingredients

(Serves 4)

  • 6 lamb cutlets
  • 400g diced lamb shoulder
  • Flour, salt and pepper
  • 3-4 large, floury potatoes
  • 2 sprigs thyme
  • 2 onions, sliced
  • 1 bay leaf
  • 300ml stock (Felicity says lamb stock, but I used a homemade chicken one because that’s what I had in the fridge, and it was fine.)
  • 20g melted butter, plus extra to grease.

Method

  • Dust the meat with the flour and seasoning.  Peel and slice the potatoes thinly.
  • Butter a casserole which has a lid.
  • Put a layer of overlapping potato slices in the bottom of the casserole, season them and sprinkle with a little thyme.
  • Put the meat and bay leaf on top, followed by the onions and some more seasoning.
  • Top with the remaining potatoes, overlapping them again.  Season these and pour on the stock, which should not come above the topping.
  • Brush the potatoes with the melted butter.
  • Put the lid on and place the casserole in the simmering oven.  Cook for 4-6 hours.
  • Thirty minutes before serving, remove the lid and transfer to the roasting oven to brown the potatoes.

I placed it in the oven at about 2pm and then all I had to do when we were ready to eat was steam some carrots (in the simmering oven of course) and cook some cabbage.


IMG_2565


By the way, for afternoon tea on the sofa, in front of the England v Wales match, we had buttered slices of this delicious “hot cross” fruit loaf which I’d bought in the morning from the Bordeaux Quay stall at Whiteladies Road Market.


Simple Stroganoff

This beef stroganoff, based on Delia Smith’s recipe, has the flavours of “proper” stroganoff but the advantage that it can be made ahead instead of at the last minute; it’s ideally suited to Aga cooking.

Ingredients

(Serves 4 people)

  • 700g fairly lean braising beef
  • 2 onions, sliced
  • 50g butter
  • 275 ml dry white wine
  • 250g mushrooms, sliced if large
  • 250ml sour cream
  • Freshly grated nutmeg
  • Salt and freshly milled black pepper

Method

  • Cut the meat into thin strips, about 5mm wide and no more than 6cm long.
  • Melt the butter in a casserole and soften the onion in it in the simmering oven for about 15 minutes.  Remove to a plate with a slotted spoon.
  • Place the casserole on the boiling plate and brown the beef in batches.
  • Once the meat is browned, move the casserole to the simmering plate and return the beef and onion to it.  Season and pour in the wine.
  • Bring to simmering point, put on the lid and let it cook in the simmering oven for 3-4 hours.
  • An hour before you want to eat, stir in the mushrooms, cover and return it to the oven.
  • Taste to check seasoning, stir in the sour cream with a good grating of nutmeg.  Don’t let the cream boil.
  • Serve with plain boiled rice and perhaps some broccoli or a green salad.

Depending on the weather, perhaps my next posts will move on to lighter, fresher dishes.

Paella

Paella might be my favourite dish.  For me it’s one of the most delicious things you can eat.

It’s made all year round but changes with the seasons.  I wonder if it’s one of those dishes like ragù in Italy where there are as many recipes for it as there are cooks.  Felicity Cloake quotes Valencian chef (Valencia being where paella originated) Llorenç Millo as saying that there are as many recipes as there are villages.

We  haven’t had a holiday in Spain for many years but we used to go to Nerja to stay in a friend’s appartment.  It was within easy walking distance of the beach along which there were several great restaurants.  Our favourite was the one where a man made paella over an open fire in the biggest paella dish you’ve ever seen.  The first time I saw this I watched him, enthralled, as he gradually added all the elements.  By the time he’d finished quite a crowd had gathered round to watch and then, finally, to eat.

He used to make what I consider to be be a traditional paella comprising chicken and seafood, but apparently paella didn’t start out as a fish or seafood dish at all.  Over the years I’ve made various permutations, the latest being this haddock one, based on a recipe by Tamasin Day-Lewis.  Hers used monkfish but there was none available when I was shopping and the haddock loin was a good alternative, in my view; I’m sure any firm white fish would work.  I’ve read that paella always contains some sort of pig meat (bacon, chorizo or pork) but I don’t think it’s essential.  My haddock one doesn’t and in fact I don’t remember the beach one containing any either.   Perhaps in future posts I’ll give you the recipe for my chicken and chorizo paella or Ottolenghi’s vegetable one, which is quite superb.  And I really ought to try Felicity Cloake’s “perfect” paella too.

You don’t have to have a paella pan.  I’m thrilled with the one pictured, a recent purchase, but before I had it, I used either a large, deepish frying pan or a wide but shallow casserole.

Paella with haddock, saffron and peppers

Serves 4

  • 5 tbsp olive oil
  • 500g haddock loin, skinned and cut into 2-3cm cubes
  • 2 onions, finely chopped
  • 2 green peppers, halved, seeded and finely chopped
  • 4 cloves of garlic, crushed
  • 1/2 tsp fennel seeds
  • 500ml (approx) of good quality fish stock (I bought mine)
  • a good pinch of saffron
  • 225g bomba (sometimes called Calasparra) rice
  • A glass of white wine or fino sherry
  • 1 small bunch flat-leaf parsley, finely chopped
  • 1/2 tsp sweet smoked paprika
  • salt and pepper
  • About 200g mussels, prawns or squid or if you prefer, any combination of these. I used a packet of frozen, cooked mixed seafood, defrosted first.
  • 225g piquillo peppers, torn in strips

IMG_2563


  • Heat 2 tablespoons of the oil in your pan on the simmering plate.  Add the haddock and stir-fry for a couple of minutes until slightly underdone.
  • Tip the fish into a dish with its juices, wipe the pan clean with kitchen paper and return to the simmering plate.  Add the remaining oil and then the onion and green pepper.  Give them a stir, coating everything in the oil and move to the simmering oven to cook for about 20 minutes until soft, adding the garlic and fennel for the last 5 minutes or so.
  • Meanwhile bring the stock to the boil in a saucepan on the boiling plate and infuse the saffron in it off the heat.
  • Add the rice to the paella pan on the simmering plate and stir to ensure every grain is coated in the oil.
  • Add the wine or sherry, followed by most but not all of the saffron-infused stock, half the parsley and the paprika and season with salt and pepper.  Do not stir from this point.
  • Once this is simmering, place it either near the bottom of the baking oven or in the simmering oven, uncovered, until there is very little liquid left.  Difficult to give precise timings because I find it varies (and as you know, timings are not usually crucial in an Aga) but maybe 30 minutes in the baking oven and 15 in the simmering oven.  If it looks dry and the rice is still not tender, add the rest of the stock.
  • When there’s still a little liquid left above the rice add the fish and seafood, pushing it down into the stock and return to the simmering oven until heated through.  It wouldn’t do any harm to leave it for half an hour like this, if you’re not quite ready to eat, but try not to leave it too long if you’ve added prawns, because they go tough and rubbery when overcooked.  Place the strips of piquillo peppers on top.
  • Let the rice sit for a few minutes on the warming plate before serving.  Finally, decorate with lemon wedges and the remaining chopped parsley.


IMG_4532

Paella with haddock and saffron