Braised Pork with Ginger and Star Anise

Braised Pork with Ginger and Star Anise

My sons gave me two cookery books for my birthday. My daugher-in-law looked a bit sceptical and asked if I was sure they were what I wanted (I do have quite a few already), but I assured her it was. I had dropped a few (many) hints in the run-up to my birthday. One of the books was Diana Henry’s new one, How to Eat a Peach, which is a beautiful 71ztiybGwmLcollection of menus rather than recipes; it’s also a sort of memoir, an account of the places she’s travelled to since she was a teenager, and where she discovered all the dishes she loves to cook and eat. I have already cooked a few of the recipes from the book, although I haven’t yet put together a whole menu. The first thing I made was this braised pork, which I pounced on because I knew it would be perfect for the AGA simmering oven. I adjusted the quantities because there were only four of us eating and off I went.


Braised Pork with Ginger and Star Anise

Serves 4

Ingredients

For the pork

  • About 1tbsp groundnut or vegetable oil
  • 1kg pork shoulder, cut into 3cm cubes
  • 200g shallots, sliced
  • 20g fresh root ginger, peeled and finely grated
  • 5 garlic cloves, finely grated or crushed
  • 5 tbsps kecap manis
  • 3 tbsps light soy sauce
  • 11/2 tbsps tamarind paste
  • 400ml chicken stock
  • 1 star anise
  • 2 medium-hot chillies, halved, deseeded and finely chopped
  • 2 birds’ eye chillies, left whole

For the crispy fried shallots

  • Groundnut or vegetable oil
  • 100g shallots, finely sliced
  • Sea salt flakes

Method

  • Spread the pork out on a large baking tray, lined with bake-o-glide and drizzle with the oil
  • Place on the top rung or on the floor of the roasting oven for 10 minutes, then remove it, turn the meat over and return the tray to the roasting oven for about 5 minutes. Your aim is to have golden brown pieces of pork; you’re not trying to turn it dark brown
  • Meanwhile  get on with your shallots. Heat a tablespoon or two of oil in the casserole you want to braise your pork in. Do this on the simmering plate. Add the shallots, turn them over in the oil, put the lid on and transfer the casserole to the simmering oven for about 15 minutes until they are soft and golden
  • Stir the garlic and ginger in and return the pork to the pan along with the kecap manis, soy sauce, tamarind and stock
  • Bring to the boil on the boiling or simmering plate, add the star anise and all the chillies and place your casserole, uncovered, in the simmering oven for about 3 hours but, as I’m sure you know, when slow cooking in the Aga simmering oven the timing is not crucial as long as you end up with meltingly tender meat
  • Remove the star anise and the whole chillies
  • Meanwhile make the crispy fried shallots by heating about 2cm of oil in a small pan on the simmering plate. Add the shallots and fry, moving them around, until they are crisp and golden. Remove with a slotted spoon to a sheet of kitchen towel on a plate and sprinkle with salt
  • If the liquid around the pork is not thick and glossy and seems a bit thin, remove the pork with a slotted spoon to a dish and keep it warm in the simmering oven. Boil the liquid for a while on the boiling or simmering plate until it’s reduced and then return the pork to the pan to heat through
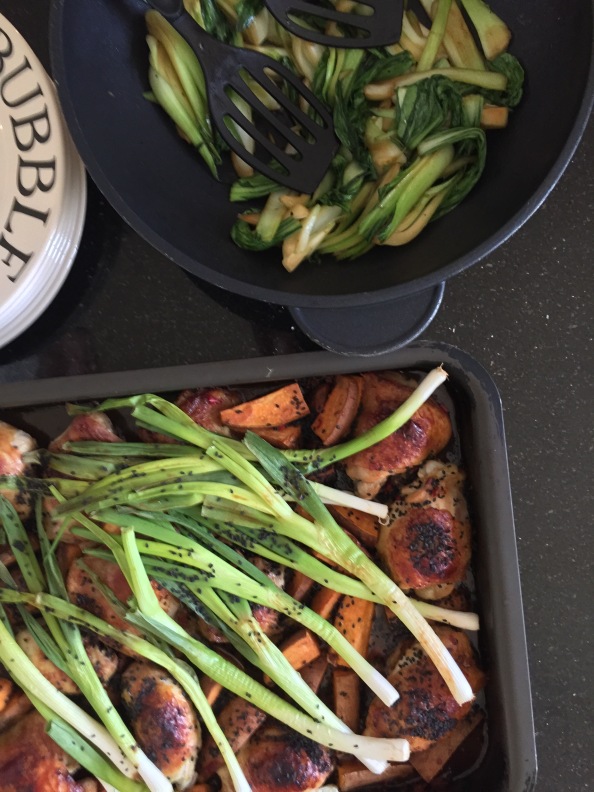
  • Serve the pork with the crispy fried shallots sprinkled over. We ate ours with rice and stir-fried pak choi

Chicken Forestière with Truffle

Chicken Forestière with Truffle

My husband was in London recently and on a whim, bought a black truffle that had just arrived in a new Italian Deli on the King’s Road and brought it home; he adores truffle. It was expensive (about £7) but you don’t need very much and can make it last for several meals. I wasn’t sure I could do it justice at first but the beauty of this small black nugget of earthy flavour is that you don’t actually have to do anything to it for it to enhance a meal. What made it really expensive was the Affetta Tartufi I bought (see photo below)! I’m always interested in quality when buying for my kitchen.

I made mushroom risotto one night: my husband acted the Italian waiter and with “pennacchio” shaved some of the truffle onto our bowls: delicious.

Then last night I cooked chicken forestière and again, we shaved truffle onto the finished dish. We don’t cook as seasonally as we used to, do we? But I do like to try. For example, I wouldn’t dream of using strawberries in December, even if they were available to buy in the supermarket. I also only cook asparagus when the British version is in season in May/June.

Chicken forestière, with its wild and chestnut mushrooms, feels like the perfect autumnal supper so I’m going to tell you how to make it here (adapted from a Diana Henry – who else? – recipe from her book A Bird in the Hand for my AGA):

Chicken Forestière

Serves 4

Ingredients

  • 8 chicken thighs or 4 chicken legs, skin on, bone in
  • 20g dried wild mushrooms
  • 1 tbsp olive oil
  • 1 onion, halved and sliced
  • 75ml Madeira (or if you don’t have any, sherry would work)
  • A couple of carrots, cut into batons
  • 175ml of chicken stock
  • 150ml double cream
  • 150g whole button or quartered chestnut mushrooms
  • 1 tbsp chopped flat-leaf parsley

Method

  • Put the dried mushrooms in a bowl and pour over 50ml boiling water. Leave to soak for about 20 minutes
  • Meanwhile, season the chicken and heat a sauté pan on the simmering plate and place the chicken in it in a single layer. No need to add oil at this stage.
  • Brown the chicken on both sides, taking care not turn the pieces over until they can easily be moved, or the skin will tear
  • Remove the chicken from the pan and put it in a dish
  • Pour the chicken fat into a frying pan and put this to one side
  • Add the tablespoon of oil to the sauté pan and cook the onions (slowly in the simmering oven if you like) until soft
  • Deglaze the pan with the madeira and add the carrots, stock, wild mushrooms and their soaking liquor
  • Bring to the boil, cover and cook for 10 minutes on the simmering plate or if you have time for 30 minutes in the simmering oven
  • Return the chicken to the pan with any juices that have run out of it. Cover and cook, choosing the simmering oven if you have plenty of time (an hour or more) or a hotter oven if you are in a hurry. I wouldn’t leave it in the roasting oven for more than 15 minutes. You could start if off there and then finish it off in the simmering oven
  • Stir in the cream and return to the simmering oven for at least 10 minutes with the lid off
  • Now place your frying pan on the boiling plate to heat the chicken fat and cook the mushrooms briskly until they are golden brown. Season and add to the chicken, stirring gently to combine everything
  • Taste for seasoning and scatter over the chopped parsley
  • The addition of the shaved truffle to individual servings is recommended but not essential

We had ours with steamed new potatoes, broccoli and green beans.


Ceviche (For When the Aga is Switched Off)

Ceviche (For When the Aga is Switched Off)

For the first time in the eleven years I’ve owned an Aga, the engineer who came to service mine last week was not able to carry out the work. It was my fault: Aga advises owners to turn it off 24 hours before the service but I in my infinite wisdom thought the evening before would be soon enough, forgetting that this year’s appointment was at the early hour of 8am. I did not realise that it would not have cooled down enough by then for the engineer to work on. I am telling you this so that you can learn from my mistake. Another tip is to lift up the lids and open all the doors to help it cool down more quickly.

If like me you have no other oven, you have to plan cold meals for when your Aga is switched off. (Mine takes about 5 hours to come back to full temperature; newer ones might be quicker; older ones possibly much slower.) I have the perfect recipe for such times, especially if it’s summer: ceviche. Ceviche is a South American dish of marinated raw fish or seafood. This one is ceviche de sierra by Diana Henry and is packed full of all the Mexican flavours I love, including chillies, lime and coriander.

Ceviche de Sierra

Serves 6

Ingredients

  • 4 fillets extremely fresh mackerel, bream or sea bass, skin removed
  • 3 limes
  • 1 shallot, very finely sliced
  • 1 large, ripe avocado
  • 4 tbsp extra-virgin olive oil
  • 1 red and 1 green chilli, halved, deseeded and finely chopped
  • 10g bunch coriander, leaves only, roughly chopped
  • 3-4 tbsp pomegranate seeds

Method

  • Slice the fish into broad strips
  • Put them into a dish with the juice of two limes and the shallot
  • Halve the avocado, remove the stone and slice the flesh
  • Peel the skin from each slice, then put them into a shallow serving bowl or on a plate
  • Season and toss in the juice of the third lime
  • Add the fish and shallot, oil, chilli and coriander and toss gently together
  • Sprinkle on the pomegranate seeds and serve


fullsizeoutput_27f8


Warm Salad of Griddled Chicken, Freekeh, Preserved Lemon, Sour Cherries and Mint

Warm Salad of Griddled Chicken, Freekeh, Preserved Lemon, Sour Cherries and Mint

The title for this recipe is very long, isn’t it? It’s another Diana Henry one but I’m making no apologies. I wanted to try freekeh (a cereal food made from unripened wheat which has been roasted and crushed into small pieces) because I’d never used it before so I pored over my various cookbooks and this was the recipe which appealed the most on the day. It’s perfect for the summer weather we’re having now. Instead of cooking the chicken in a griddle pan, you could barbecue it outside.

I’m enjoying the weather. We’ve barbecued twice this weekend, which has been lovely. My husband was supposed to be taking it easy after a small operation on Friday, but was up to standing at the grill while I got on with preparing vegetables and salads.

For the Chicken

Serves 4

  • 4 skinless boneless chicken thighs or breasts
  • 4 garlic cloves, grated or crushed
  • salt and pepper
  • juice of 1 lemon
  • 6 tbsp olive oil

For the Salad

  • 100g dried sour cherries
  • 2 preserved lemons
  • 200g freekeh
  • 1 tbsp olive oil
  • 4 tbsp extra virgin olive oil
  • 2 tsp honey (or maple syrup)
  • 3 tsp white balsamic vinegar
  • juice of ½ lemon
  • good pinch of ground cinnamon
  • laves from 10 sprigs of mint, torn
  • 10g chopped flat-leaf parsley

Method

  • If you are using breasts and they’re particularly thick, cut them in half horizontally. Marinate the chicken if you have time, even if it’s only for an hour or two. Mix the garlic, seasoning, lemon juice and olive oil in a dish and lay the chicken it it, turning it to coat. Cover with clingfilm and put in the fridge. Bring to room temperature before cooking
  • Place your griddle pan on the floor of the Aga roasting oven to get it really hot
  • Put the cherries in a small saucepan and add enough water to just cover. Bring to the boil on the boiling plate, then remove from the heat and leave to plump up for 30 minutes
  • Remove the flesh from the preserved lemons and discard. Cut the rind into slivers
  • Put the freekeh into a saucepan and cover with water, adding the regular olive oil and seasoning well. Bring to the boil on the boiling plate, then cover and transfer to the simmering oven for about half an hour, or until just tender. Drain
  • In a serving bowl mix the virgin oil, honey or maple syrup, white balsamic, lemon juice, cinnamon and plenty of salt and pepper. Add the drained freekeh and stir
  • Drain the cherries and fork them into the grains with the preserved lemon and most of the herbs
  • Place the heated griddle pan on the boiling plate and put the chicken on it (leaving the marinade behind)
  • Let it sizzle and splatter for two minutes, then turn it over. At this point you can place the griddle pan back on the floor of the roasting oven and leave the chicken to cook there for about 8 minutes until it’s cooked through. You can keep the griddle plan on the boiling plate and then move it to the simmering plate if you prefer but placing it in the oven minimises the amount of fat splattering everywhere
  • Taste the freekeh. You might want to add more lemon juice. The mixture should be moist and well-seasoned
  • Divide between four plates and serve the chicken on top or alongside, scattering the remaining herbs over. I served ours with some tzatziki

Our weekend in the garden:


Chicken and Sweet Potatoes with Miso, Ginger and Spring Onions

Chicken and Sweet Potatoes with Miso, Ginger and Spring Onions


Another of my Easter weekend dishes was this simple chicken traybake, which is also a Diana Henry recipe. It appeared in the Telegraph’s Stella magazine a few weeks ago. I tried it then and knew my family would like it. It’s perfectly suited to Aga cooking.

Ingredients

For 4-6 people, depending on hunger levels and the size of the chicken thighs

  • 8 chicken thighs
  • 700g sweet potatoes, washed and cut into wedges
  • 2½ tbsp white miso
  • 1 ½ tbsp honey or maple syrup
  • 2 tbsp rice wine
  • 1 tbsp dark soy sauce
  • 2.5cm chunk ginger root, peeled and grated or finely chopped
  • 3 cloves garlic, crushed
  • 1 red chilli, halved and finely chopped (use the seeds for extra heat)
  • 12-18 spring onions
  • 3 tsp black or toasted white sesame seeds (or a mixture of the two)

For the final basting

  • 1 tbsp white miso
  • 1 tbsp honey or maple syrup
  • ½ tbsp dark soy sauce
  • ½ tbsp rice wine

Method

Pre-heat conventional oven to 190ºC/gas mark 5

  • Place the thighs in a large roasting tin with the sweet potato wedges (they should be able to lie in a single layer)
  • Mix together everything else except the spring onions and sesame seeds. Pour this over the chicken and sweet potatoes, turning everything over so the ingredients are well coated, finishing with the chicken skin-side up
  • Roast for 45 minutes at the top of the roasting oven, basting every so often, and turning the wedges over
  • Mix the final basting ingredients together and about 15 minutes before the end of cooking time, take the tin out of the oven and pour them over, adding the spring onions at the same time. They should become soft and slightly charred
  • When cooked, sprinkle with the sesame seeds and serve
  • I served ours with pak choi stir-fried in a little groundnut oil with black pepper and soy sauce

IMG_4483


Indian Leg of Lamb

Indian Leg of Lamb

We had a lovely weekend at home this Easter, with our sons and two of their girlfriends joining us for most of it. I tried to keep the cooking as simple (but delicious) as possible and had a cooking-free Saturday night when we went to our local Italian to celebrate my birthday the previous week.

For Easter Sunday lunch I ordered a large leg of lamb from the butcher and asked him to remove the bone and butterfly it. My thinking was that it would cook more quickly and carve more easily (although carving is my (surgeon) husband’s job!).

On Saturday afternoon I prepared the marinade, covered the lamb and put it in the fridge to be forgotten about until Sunday morning.61zmh4n5vpl

I adapted the following recipe from Diana Henry’s book, Cook Simple.

Indian Leg of Lamb

For about 8 people

Ingredients

  • 1 x 2kg leg of lamb, boned and butterflied
  • 55g blanched almonds
  • 2 onions, roughly chopped
  • 8 garlic cloves, peeled and halved
  • a big chunk of fresh root ginger, peeled and roughly chopped
  • 4 green chillies, halved and deseeded
  • 550g plain yoghurt
  • 1 tbsp ground cumin
  • 4 tsps ground coriander
  • 2 tsps ground cinnamon
  • 2 tsps garam masala
  • salt and pepper

Method

  • Make deep gashes all over the meat with a sharp knife and put it in a dish
  • Blitz everything else in a food processor and spread this all over the lamb, massaging it in with your hands. It will look like this: IMG_4477
  • Cover with clingfilm and place in the fridge
  • On Sunday morning, preheat a conventional oven to 200ºC, take the lamb out of the fridge and let it come up to room temperature. Place it in a large roasting tin and cover with foil
  • Aga users: put it in the roasting oven for about 30 minutes, then remove the foil for 5 or ten minutes before placing the lamb in the simmering oven until you’re ready to serve lunch. This was 2pm in our case, so the total cooking time was about four and a half hours. If you’re using a conventional oven, the cooking time is about one and a half hours, with the foil removed for the last 20 minutes or so
  • Leave the lamb to rest on a board while you reheat the cooking juices, stirring as you go, to make a delicious sauce to be served with the lamb
  • I served our lamb with a pilaff, carrots roasted with coriander and garlic and two green vegetables

fullsizeoutput_1ebb

SIMPLE


simple-jacket

Simple is the name of Diana Henry’s latest cookery book which was published this week.  If you read my blog regularly you will know I am a massive fan of her recipes.  I bought a copy as a birthday present for my future daughter-in-law; she and my son are keen cooks and, like me, love her way of cooking.  But I was going to resist buying a copy for myself and be patient and wait for someone to maybe give me one for Christmas.  Then my friend Caroline, another fan and a temptress, told me she’d already received hers and how brilliant it is.  You can guess the rest.  By the wonders of Amazon Prime membership my copy will be with me this evening.

Plum Torte


When I posted a photo of this to Instagram yesterday I called it plum cake but it’s officially a torte and with just the two eggs, it is definitely a little less cake-y than most cakes.

Anyway, I recommend the recipe to you.  I bought a whole load of Victoria plums on Friday with the vague intention of doing a seasonal weekend bake but with no specific recipe in mind.  I couldn’t find the Diana Henry recipe I thought I had in one of her books so I Googled “Diana Henry plum cake” and this was the result.  The observant among you will notice it uses purple plums, but I saw no reason to let that put me off and brazenly set to work with my pinkish yellow Victoria ones.

I do hope it’s fine to post the recipe here.

Ingredients

  • 125g plain flour
  • 1tsp baking powder
  • pinch of salt
  • 115g butter, softened
  • 200g soft light brown sugar
  • 2 large eggs
  • 1 tsp vanilla extract
  • about 9 plums, halved and stoned
  • 1 tbsp granulated sugar
  • 2 tsp lemon juice

Method

(Preheat conventional oven to 180ºC)

You will need a 23cm springform tin.  Not sure why but Henry says ungreased.  I obeyed and it came out fine.

Don’t forget the sugar and lemon juice topping; I haven’t tried it without but have a feeling it makes all the difference, to both taste and texture.

  • Henry doesn’t, but I used the all-in-one method and placed all the ingredients except for the plums, granulated sugar and lemon juice in the bowl of my KitchenAid and mixed at high speed for about 2 minutes until thoroughly blended.
  • Spoon the mixture into your tin and place the plums, skin-side up, on top.
  • Sprinkle the granulated sugar and lemon juice over the cake and bake (in the Aga baking oven).  Takes about 45 minutes, in a conventional oven or the Aga.
  • The cake is done when it starts to come away from the sides of the tin and a skewer inserted into the middle comes out clean.
  • Leave it to cool for 20 minutes on a rack and then release from the tin.  Be careful: it’s quite fragile and the plums have probably sunk to the bottom but this doesn’t matter at all.
  • We ate it at room temperature but it would have been just as delicious slightly warm.


Tarts and Scones

IMG_2778

Making tarts or quiches in an Aga could not be easier because you do not have to bake the pastry blind.  Take the tart above, which I made on Friday.  I used this recipe by Diana Henry but was able to omit several stages and go straight from chilling the lined tart tin to adding the filling and baking it.

On this occasion I didn’t even make the pastry myself.  I bought some good quality all butter shortcrust in sheets, which meant minimal rolling out was required.  Once I’d lined my tin with it, I put it in the freezer to firm up, as Diana advises, but I did not prick the pastry with a fork; this is not necessary if you are not baking it blind.

I’m not sure how long mine was in the freezer for, but probably no longer than half an hour.  I did a bit of washing up (I’m one of those cooks who clears up as she goes along) and prepared the filling while this was happening.  So then all I had to do was put the crab/salmon/Thai ingredients in the pastry case and pour over the cream/egg mixture and cook my tart.  This I did by placing it straight onto the floor of the Aga roasting oven and leaving it there for about thirty-five minutes.  I checked on it after twenty though.  It was done when the filling was golden and no longer wobbly.  I removed it and let it rest while I roasted some new season English asparagus to go with it.  A nice green salad would have been a good accompaniment too.  We thought this tart was delicious.  I have resolved to make more such things during the summer.  A tart makes excellent picnic food and if you have any left over, it keeps well in the fridge and is available for any peckish moments.  I’ve just remembered a rather delicious smoked salmon one I used to make.  Must dig out the recipe.

On Saturday I did absolutely no cooking, which was a treat.  We were in London for the day and went out for a lovely family lunch at our favourite Italian restaurant, fittingly called La Famiglia.  The reason for the gathering was that one of my cousins had come over from Norway to visit his aunt, my mother.  All my boys were able to join us and together with one girlfriend and one fiancée there were ten of us round the table.  My husband, youngest son and I didn’t get back to Bristol until about 8.30 in the evening (in time to catch most of Eurovision).  We weren’t really hungry but managed to squeeze in a little slice of the tart all the same.

On Sunday afternoon I made scones for afternoon tea.  I cannot think of anything quicker to bake than scones and I just love them.  The recipe I chose was this one by Thane Prince which uses buttermilk.  The scones are light and not at all rich.  If you want a richer scone, there are plenty of recipes which use eggs, like this Mary Berry one.

Update: BBC Food Website

Following the devastating news today that the BBC is to remove all 11,000 recipes from its food website, I need to update this post.  The Mary Berry scone recipe link above will soon no longer function.  It was probably a bit lazy of me merely to give you a link anyway, so I’m giving you below one of her scone recipes in full.  It’s one I’ve used many times.  And don’t worry, I have no plans to remove any recipes from my blog so it will be here for you to use forever!

Mary Berry’s Very Best Scones

  • Makes about 20
  • Pre-heat conventional oven to 220ºC
  • You will need two large baking trays, lightly greased or lined with bake-o-glide

Ingredients

  • 450g SR flour
  • 2 rounded teaspoons baking powder
  • 75g butter, at room temperature
  • 50g caster sugar
  • 2 large eggs
  • about 225 ml milk

Method

  • Sieve the flour and baking powder into a large bowl and rub the butter into it with your fingertips, until it resembles fine breadcrumbs.  You can pulse this in a food processor if you prefer
  • Stir in the sugar (and pulse again if using food processor)
  • Beat the eggs together and make up to a generous 300ml with the milk, then reserve 2 tablespoons of this for glazing the scones later
  • Gradually add the egg mixture to the dry ingredients, stirring it in until you have a soft dough.  Again, this can be done in a processor
  • The mixture should be on the wet side, sticking to your fingers, as the scones will rise better
  • Tip the dough onto a lightly floured surface and flatten it out with your hand to a thickness of 1-2 cms.  Use a 5cm fluted cutter to stamp out the scones by pushing the cutter straight down into the dough (as opposed to twisting it), then lifting it straight out
  • Gently push the remaining dough together, knead very lightly, then re-flatten (you could use a rolling pin) and cut out more scones
  • Arrange the scones on the baking trays and brush the tops with the reserved beaten egg mixture to glaze
  • Bake, one tray at a time, with the tray on the third rung in the Aga roasting oven, or in the pre-heated conventional oven, for 10-15 minutes, until well risen and golden
  • Transfer to a wire rack and leave to cool


Pheasant

image

Pheasants were probably brought to Britain by the Romans. The common pheasant (Phasianus colchicus) has been superseded in British estates by captive breeding and hybridisation between subspecies from all over the world to improve flying and holding qualities. The bird on your plate in Britain is probably a cross of Polish, French, Danish, American and Japanese.

Almost every weekend during the shooting season, which runs from 1 October to 1 February, we eat pheasant. Purists out there might be shocked that we don’t leave ours to hang because we find the taste then becomes just too gamey. So birds brought back from a Saturday shoot are invariably eaten the next day.

IMG_0688

Rosie and Millie had a great day.

IMG_0685

The birds before plucking.

Very often I simply roast the birds, having smeared them in butter and wrapped them in bacon but pheasant, especially the older birds towards the end of the season, can be rather dry, so yesterday I chose to braise the birds, using a recipe by one of my favourite cooks, Diana Henry. It’s in her book “Food from Plenty”. (I cooked a brace but the recipe is for one bird.)

You need:

  • 65g butter
  • 1 oven-ready pheasant
  • 6 shallots, peeled and sliced
  • 1 carrot, diced
  • 1 stick celery, diced
  • 100g bacon lardons, or chopped streaky bacon
  • 1 small Savoy cabbage, shredded
  • 200ml chicken stock
  • 6 juniper berries, crushed
  • 3 sprigs fresh thyme

This is what you do:

  • Heat conventional oven to 190ºc
  • On the simmering plate, melt 25g of the butter in a heavy-bottomed flameproof casserole and brown the pheasant all over and set it aside. You can also do this on the floor of the roasting oven.
  • Add 2 tbsp olive oil to the pan, along with the shallots, carrot, celery and bacon. Cook until golden; can do this fairly quickly on the simmering plate or the floor of the roasting oven or more slowly in the simmering oven.
  • Add the cabbage, juniper and remaining butter.  Season and turn the cabbage to get it coated in butter.
  • Add the chicken stock and 3 thyme springs and bring to the boil
  • Return the pheasant to the casserole, cover and place in the roasting oven for 40 minutes, removing the lid for the last 15 minutes.
  • Or, if you have plenty of time, you can just leave this to cook in the simmering oven for an hour or two, uncovering it and browning it in the roasting oven for the last 15 minutes.

Cheat’s tip: if you don’t have any shallots use frozen, already peeled and chopped ones, available from Waitrose and probably other supermarkets too.  I always keep a packet in the freezer.

IMG_0560

The finished dish.